Schema tags are bits of semantic microdata placed on your website’s page level HTML code. This microdata highlights content of your choosing for crawlers, which helps search engines to better read and represent your pages on the search results pages.
Specifically, when implementing schema markup, the result is that Google and the other search engines may include additional content to accompany your page’s listing on the search results pages. This looks something like below:
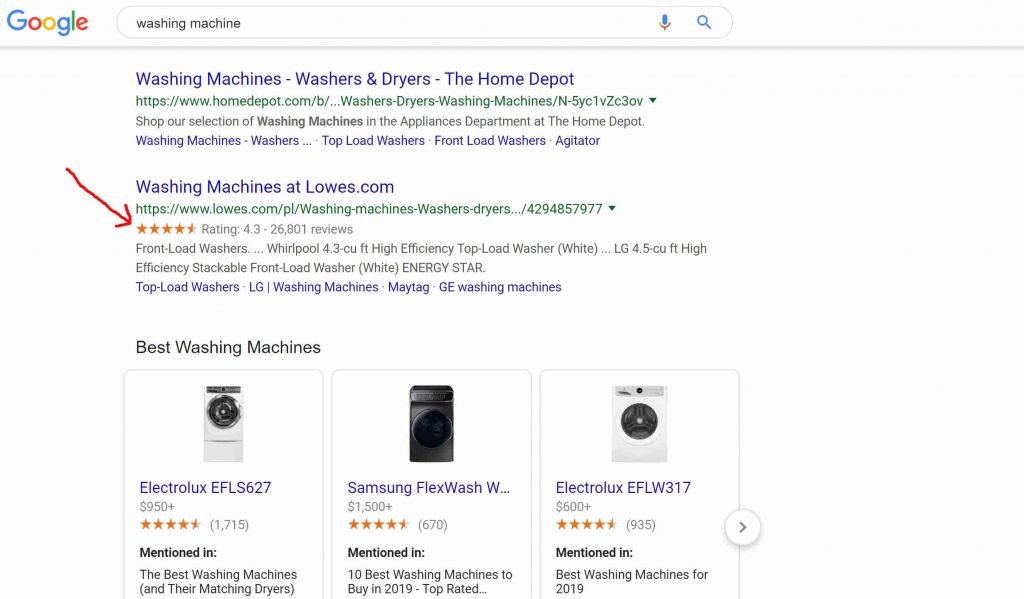
Clearly, now your prospects have a little more to read about you before making the decision to click, and your listing takes up more web estate.
The end result is higher click through rates. This is a tremendous benefit for two reasons:
To sum it up, Schema tags are a great tool to add to your on-page SEO arsenal.
To iterate on point number two above, click through rates (or CTR) are an indirect ranking signal which can help increase your overall rankings, which results in an increase in organic impression share (and thus, clicks).
Now, there are conflicted views on the impact of CTR on search rankings. But I implore the naysayers to just think logically about this.
A higher CTR indicates a better user experience for Google’s users, and a lower CTR indicates that users are not happy with the listing. It is also very easy for the search giant to track CTR (they actually give you the metric for free in the Search Console).
Then why would Google not use this as an indirect ranking factor if it impacts the user experience?
Logic aside, there were many case studies done on the measurable impact that CTR has on organic rankings. Take a look at this post by Larry Kim. His experiments draw a clear correlation between rankings and not only CTR, but website engagement/retention metrics as well.
Go Larry!
These days you can highlight just about anything; product reviews, image details, company details, blog post headers, key selling points…literally anything you can think of!
Follow the below four points closely to avoid search penalties:
There are a number of different ways to markup your pages. You can use RDFa’s (an HTML5 extension), microdata (an open-community HTML specification), or JSON-LD (a Javascript code).
Google recommends using JSON-LD for implementing schema tags on your pages. Since this is a Javascript, we can leverage the lightweight power of Google Tag Manager (or GTM) to implement it (and do it far more efficiently).
Allow me to introduce you to Schema.org. This is a collaborative semantic coding library recognized by many search engines (like Google, Yahoo, Bing, Yandex, etc).
Whatever you need to markup can be found in this library complete with the code that you will need to implement.
Let’s take the example of highlighting the aggregate rating of a product on your website. The end goal is to have this rating highlighted on the search results pages when someone searches for your product.
Start by inputting the word “Ratings” into the search bar on Schema.org and then click on the “AggregateRating” link from the list (as seen below).
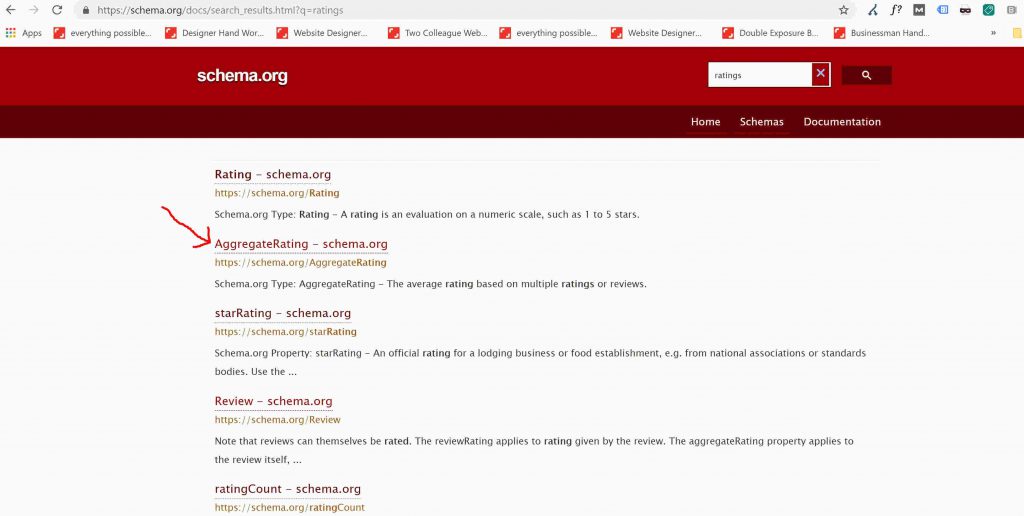
This will take you to the library page for “AggregateRating” where you will find all the attributes that you can markup that are associated with ratings. Now you can markup things like average user rating, number of reviews, best rating, etc.
If you scroll all the way down the page, Schema.org then gives you examples of what the code looks like in Microdata, RDFa, and JSON-LD formats.
We are only interested in JSON-LD. However, the samples that Schema.org has shown us, while helpful, are not intuitive and actually quite difficult to get right.
Luckily, there’s a tool out there called the Schema App. This tool actually generates the code you need for you (which makes things so much easier).
Go to the Schema App website (using the link above), and then click on the dropdown bar and choose “Aggregate Rating”. You will be presented with a page that allows you to simply fill in values for fields of interest.
Scroll down the page and input values for things like “item reviewed”, “rating count”, “best rating”, and rating value”.
As you input values you’ll notice on the right hand sidebar that SchemaApp is actually building out a snippet of Javascript code with your selected values. It looks something like this:
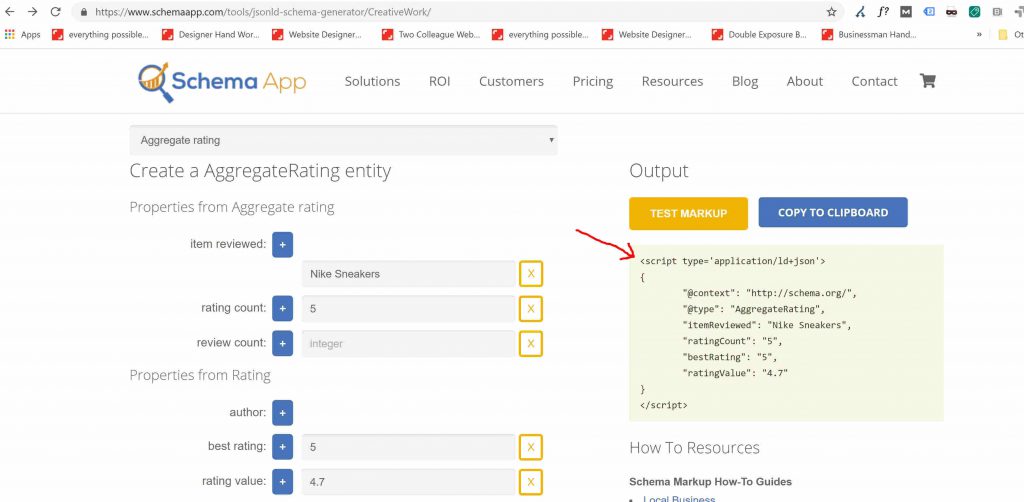
This is the JSON-LD script you need to embed on the product page’s HTML. Go ahead and hit the “Test Markup” button above the code. This will take you to Google’s Structured Data Testing Tool.
This tool will let you know if there are any issues with your schema setup.
If the code works without errors, go ahead and copy and save to Notepad (in UTF-8).
Now that we have the code, let’s implement it via Google Tag Manager.
Start by accessing your GTM account. If you do not have one set up already, check out this blog post which briefly dives into the setup process.
Jump into your account and create a new tag. Start with “Tag Type” and choose “Custom HTML”. Copy and paste the code you saved from notepad into the “HTML” window. And check the box below that says “Support document.write”.

You have to replace everything above “@context”: “http://schema.org/” with the following:
<script>
(function()
{
var data = {
And you have to replace the closing <script> line with the following:
var script = document.createElement(‘script’);
script.type = “application/ld+json”;
script.innerHTML = JSON.stringify(data);
document.getElementsByTagName(‘head’)[0].appendChild(script);
})(document);
</script>
Don’t ask me why, but if you do not do this crucial step your GTM code will throw errors on Google’s Structured Data Testing Tool.
Once you have made the changes, scroll down to the next section (called “Triggering”) and create a trigger so that the tag can fire upon command.
Hit the little “Edit” icon on the top left corner of the window, this will expand a new window, then hit “+” button on the top right hand corner of that window, hit the “Edit” icon one more time and then choose “Pageview” from the list.
On the next page you choose the conditions that need to be met for the trigger to fire. Choose, the “Some Page Views” radio button.
Then choose how you want to set your conditions. You can do this via a multitude of options; likely “Page URL” will suffice for nearly everyone.
Then choose logic operator you want to use via the middle dropdown (likely the “Contains” value) and insert the corresponding value into the third field (which would be the URL of the page you want the trigger to fire on).
For example, if I wanted the trigger to fire on this page https://xoobo.com/marketing-services/website-design-development, I would input “xoobo.com/marketing-services/website-design-development” in the third field (which would mean the trigger will only fire on this page).
Hit “Save”, hit “Save” again for the tag, and then hit “Submit” for publishing the container.
Now, jump into preview mode and browse the page you just set up the tag for and verify that it is firing properly.

Then go to Google’s Structured Data Testing Tool (link is above) and input the URL of the page you have the tag on. It will show you how Google views your new structured data, and also will show any errors (if any).
You just implemented a JSON-LD schema tag on your website via Google Tag Manager…hooray!
Follow this exact same process when highlighting other content on pages throughout your site.
Go through the Schema.org library to know more about what you can mark up. You’ll find the possibilities are truly endless.
If you have any questions or need any help implementing schema tags on your website, just know that you can always count on us!
What other content should you markup on your website? Feel free to provide your suggestions below in the comments section!

Leave a Reply