Are you thinking of migrating your blog from Blogger to WordPress without losing your traffic?
Are you tired of the limitations set by Blogger?
Then you’ve come to the right place because I have outlined the whole process for you with pretty screenshots and all!
This is going to be a very in-depth tutorial, folks, so bookmark this page and keep coming back as you continually execute each step laid out in front of you.
Let’s get started, shall we?
If you don’t know about Blogger, it is a Google-owned platform that is considered the best platform for beginners.
But why? Because it offers a free custom domain that you can point to Blogger while other services charge monthly fees for it.
Moreover, as compared to other services, Blogger lets you remove the branding at the footer at no extra cost.
Now, I understand Blogger is great, but WordPress is the best—powering 34% of the internet.
You might be thinking what does make WordPress a better content management system, here are four reasons.
Search Engine Optimization is the backbone of WordPress. Even if you don’t have any programming language experience, you can execute on-page SEO perfectly on WordPress.
Moreover, WordPress has more than 3500 SEO plugins, how amazing is that?
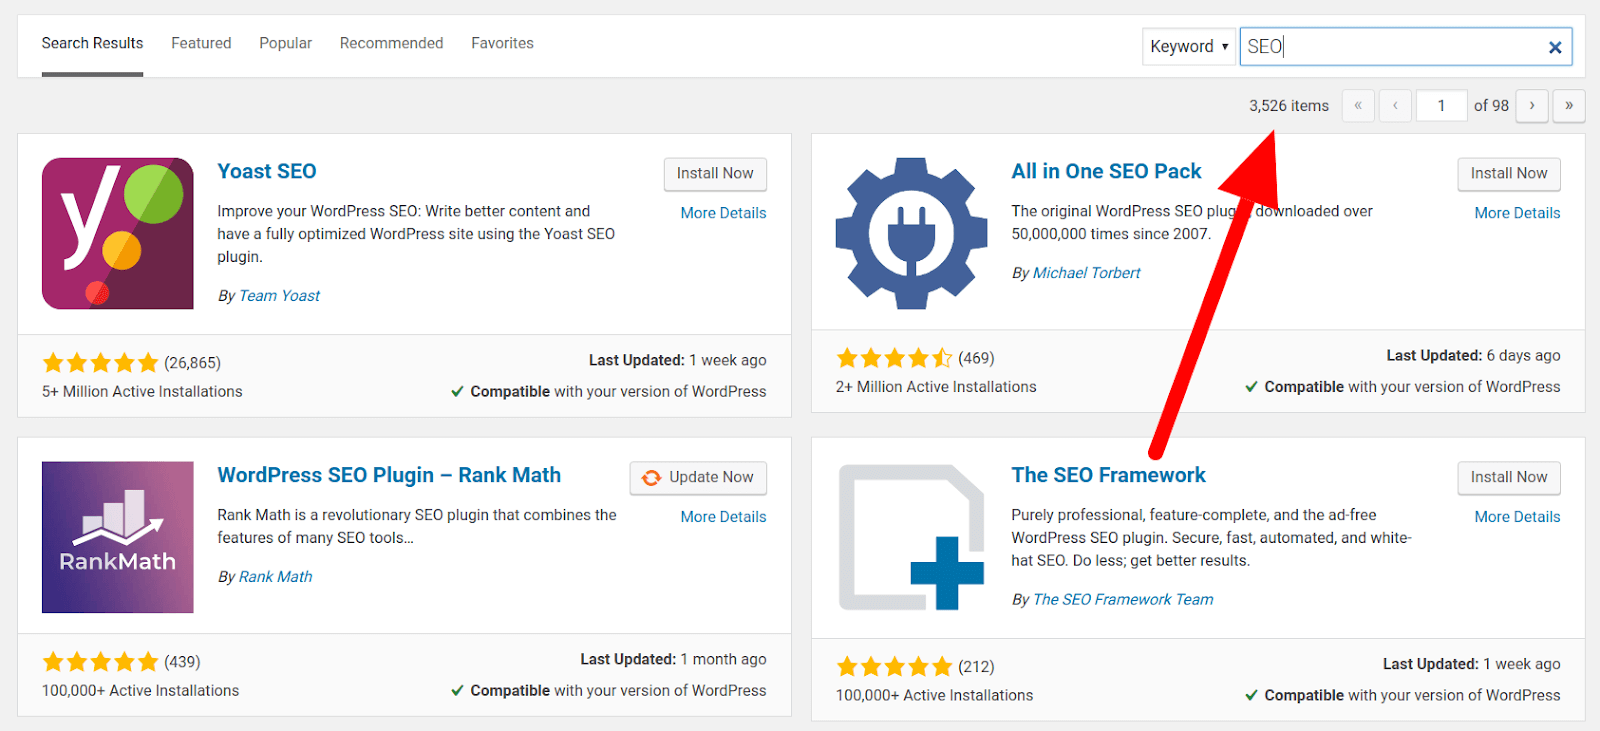
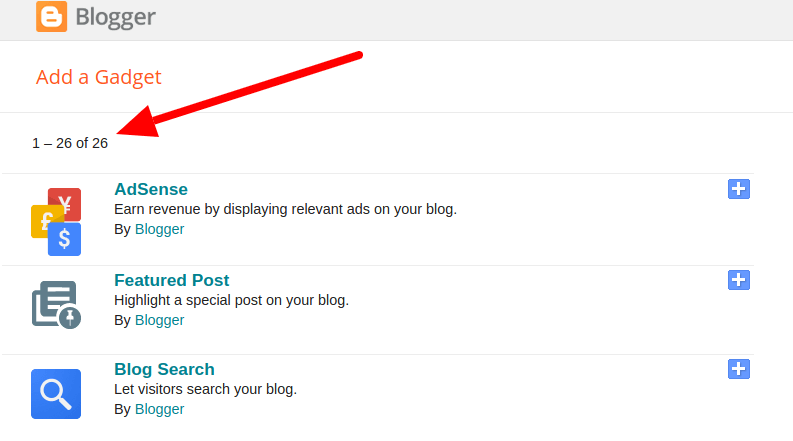
What does Blogger have? Just 26 total widgets. It is truly dwarfed in comparison.
I know what a Blogger lover might be thinking, “I don’t need an SEO plugin because I know On-Page SEO very well.”
Seriously? Do you still think on-page SEO still works the same way as it did in 2008? It will not work if you just put your keyword in the title, permalink, first paragraph, and headings. It has changed quite dramatically over the last 10 years
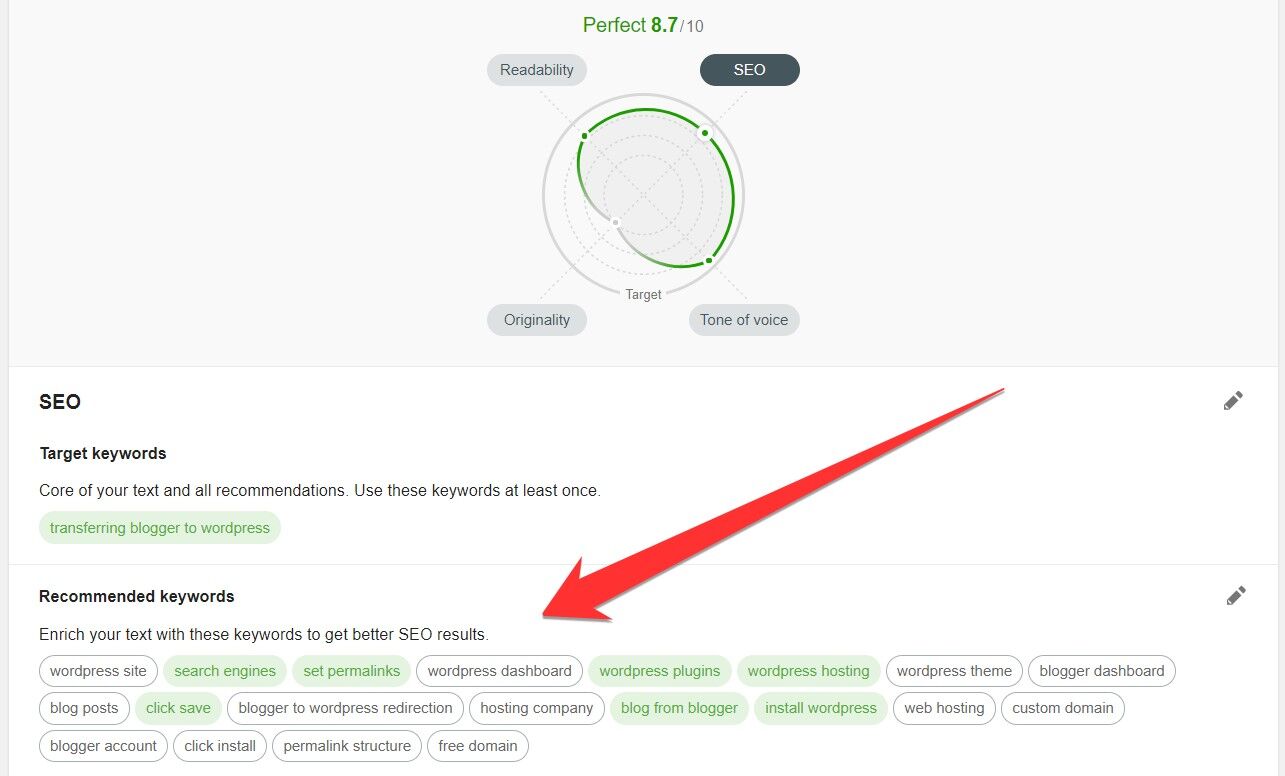
Now on-page SEO is about writing content semantically relevant, user-centric, and value-oriented.
On WordPress, you find helpful plugins to optimize your content like SEMrush Assistant. It lets you know the keywords that you should use in your content to enhance relevance in order to achieve better rankings in Google.
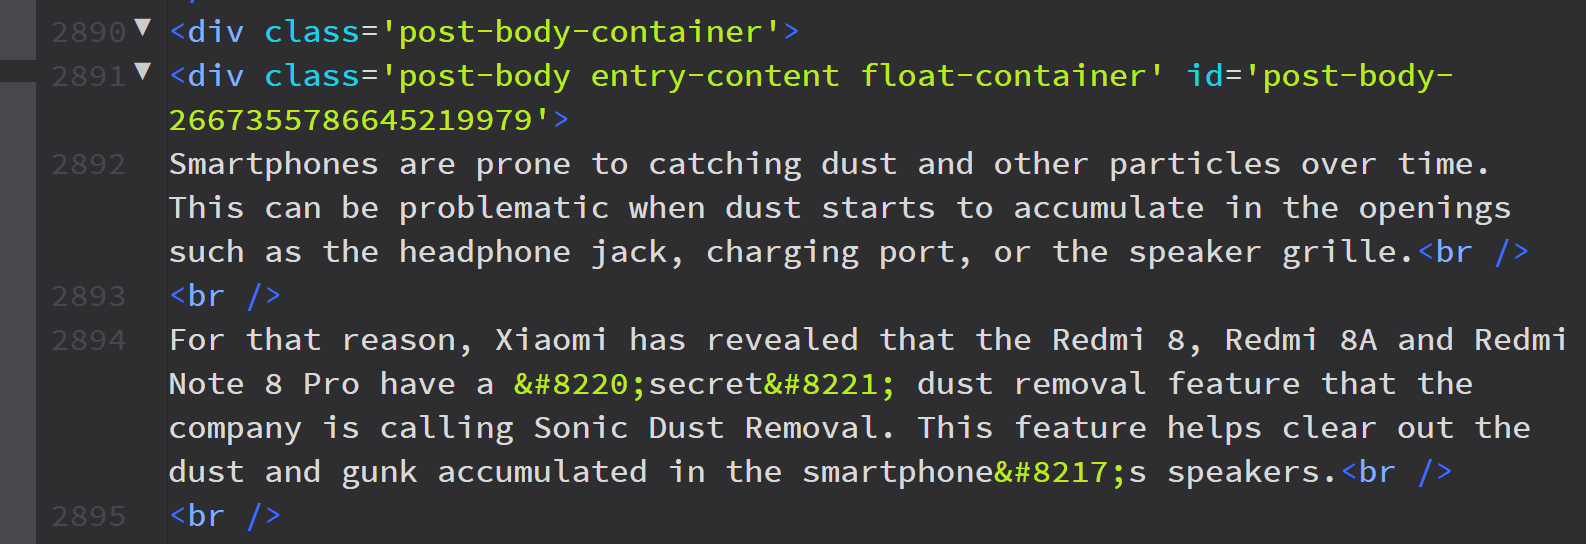
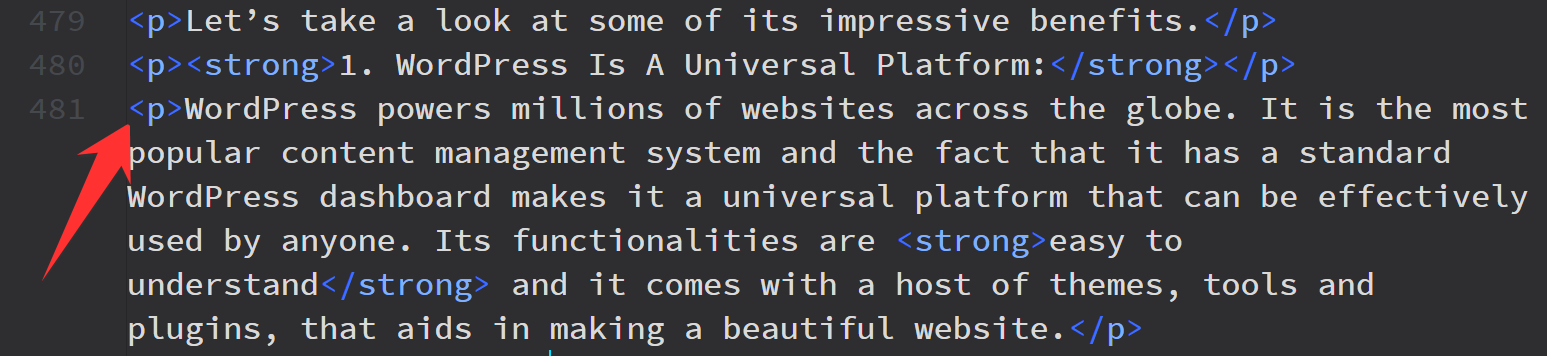
Apart from this, the biggest disadvantage of Blogger that it doesn’t have SEO friendly HTML formatting. In other words, it entirely lacks semantic HTML.
If you look at the source code of Blogger after publishing a post, it doesn’t have any <p> tag, which is a critical element in semantic HTML and SEO. Not only that, Blogger adds unwanted elements like “‥”.
You might be thinking what’s wrong with that?
The reason is simple. You are less likely to get a featured snippet in Google. Like this:
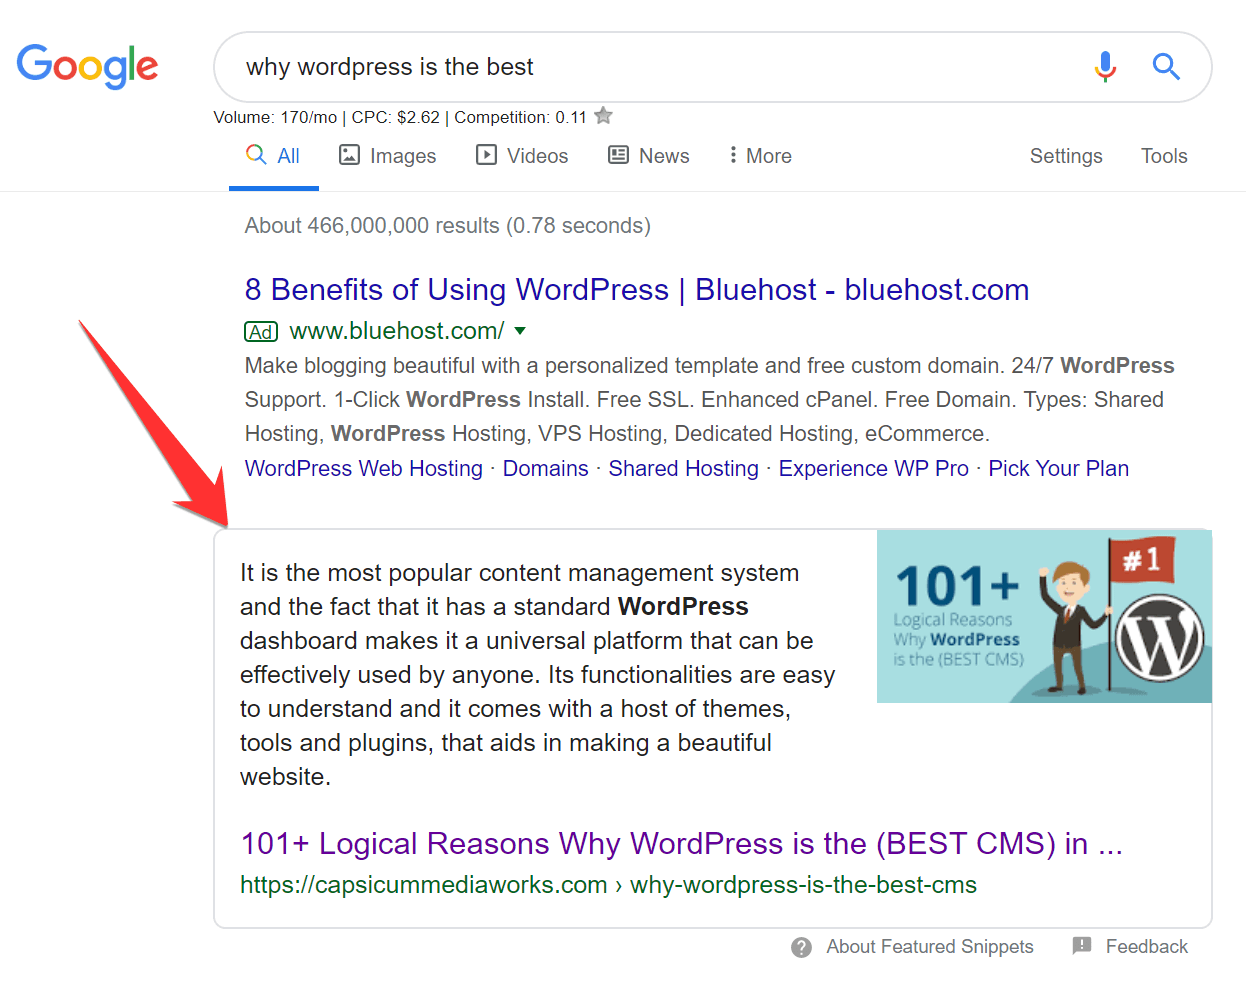
If you look at the source code of featured snippets for any keyword in Google, they probably have a crystal clean semantic HTML.
Don’t believe me?
Look at the source code of the below-featured snippet; it is semantically correct having <p> elements. It helps Google to extract the necessary information efficiently.
And the worst part?
You can’t change permalinks on Blogger (they are not SEO friendly). It forces extra characters and the date on the URL.

You must be wondering by now, why does it matter? It matters because:
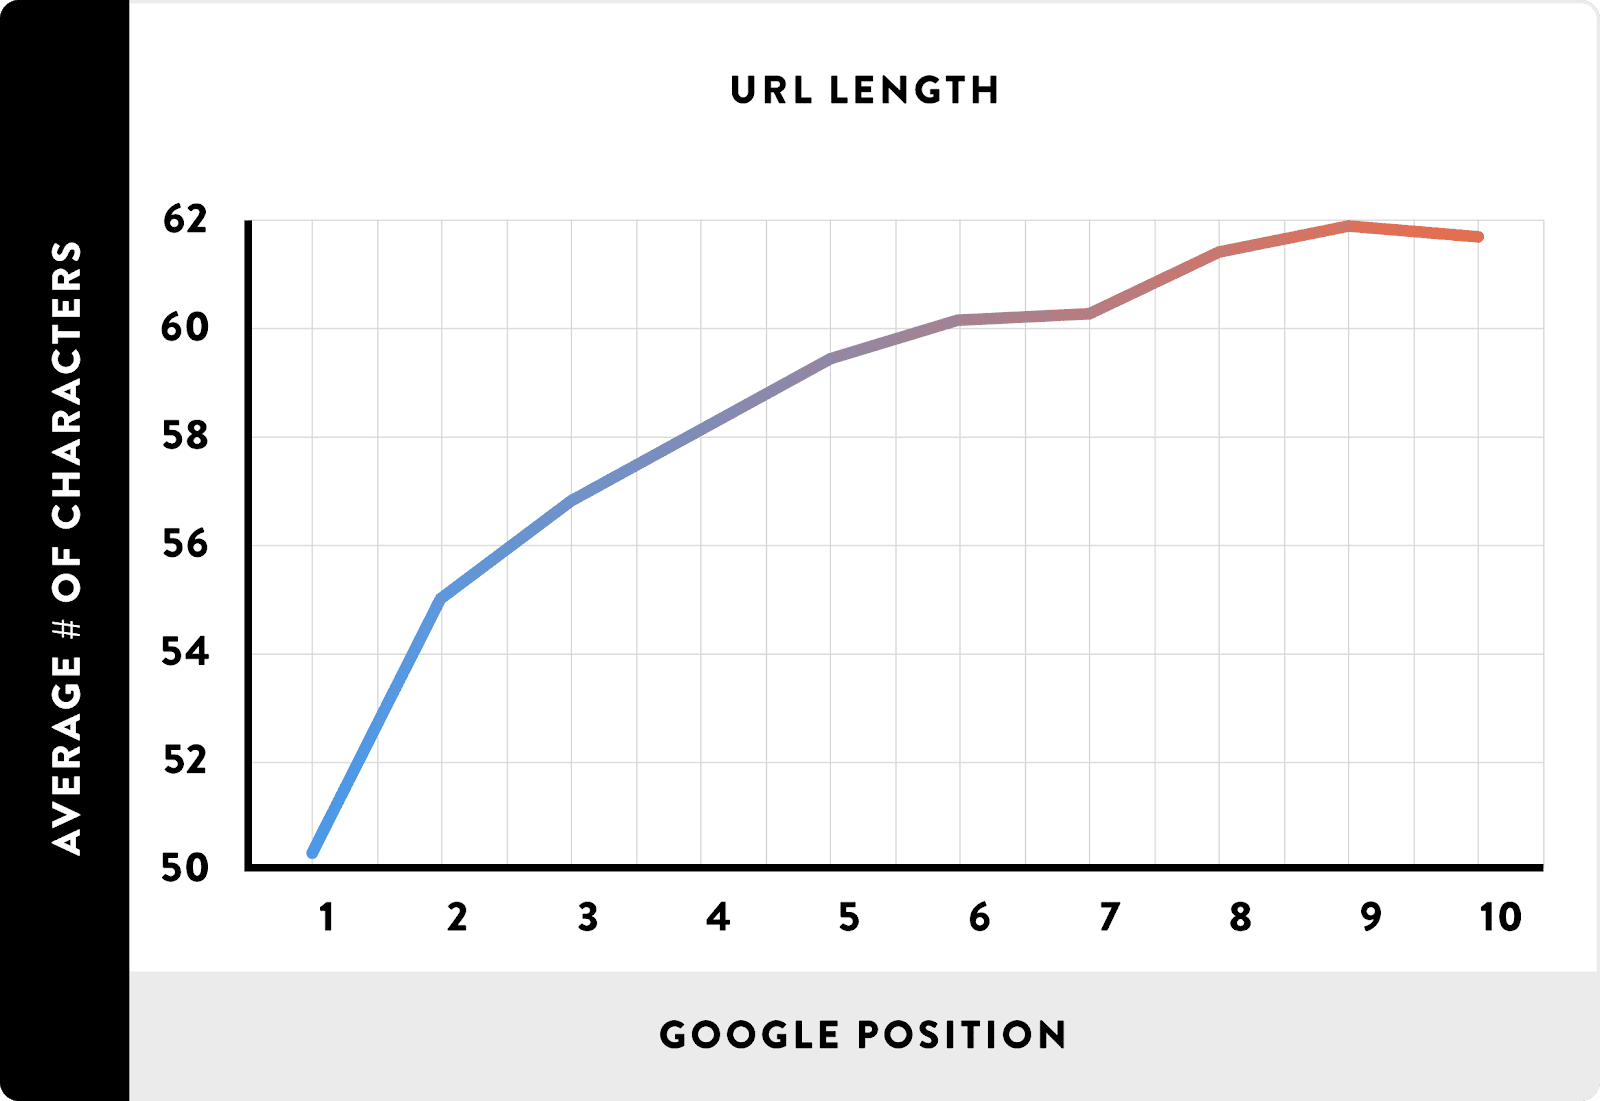
Conversely, on WordPress, the permalink structure is highly customizable.

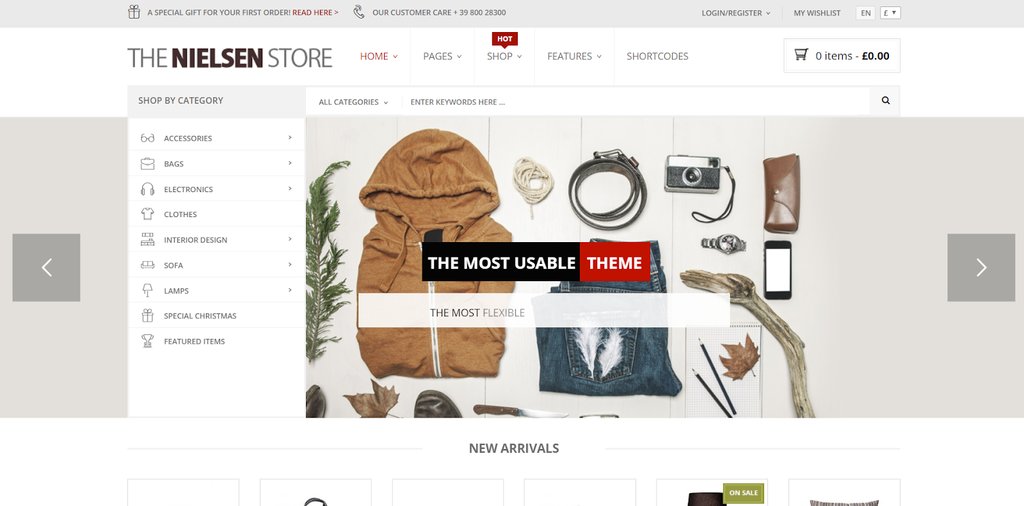
There are thousands of WordPress themes for nearly any vertical out there.

The list goes on and on.
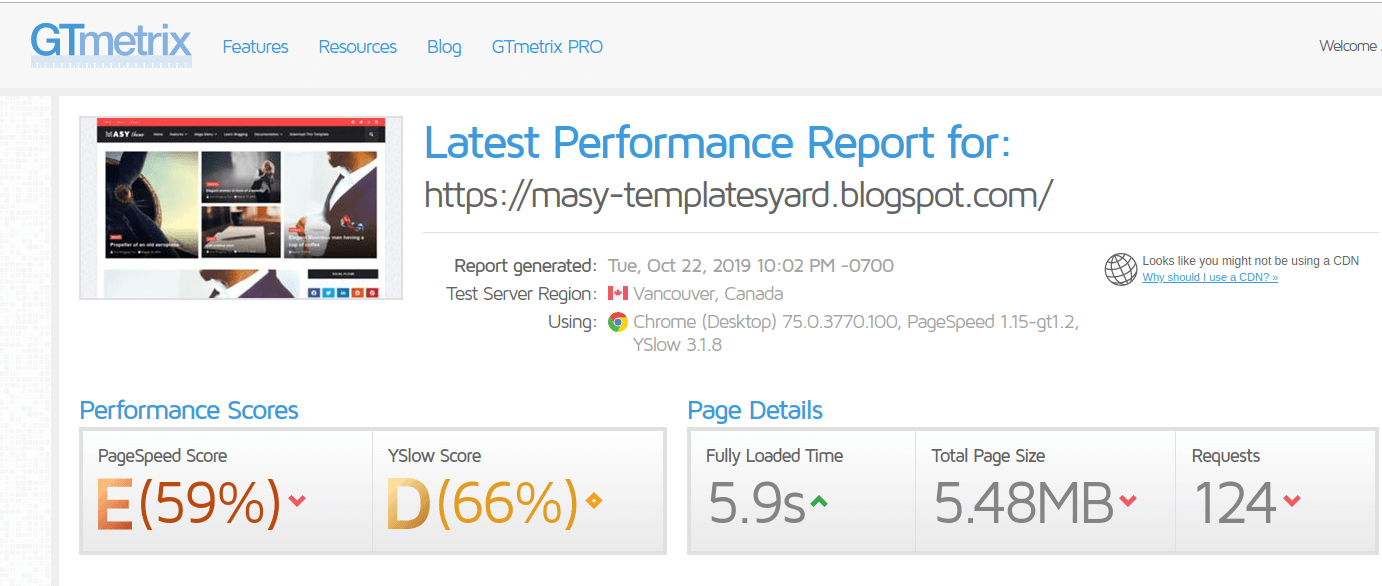
Below is a premium Blogger theme running on Google hosting (i.e., Blogger). Since Blogger doesn’t have any plugins for compressing images, caching, and minifying CSS and JS, it is very slow to load.
Do you want to feel anxious when you wake up in the morning?
Absolutely not. You shouldn’t be on Blogger because your blog can get deleted for no reason.
Did you know a writer wrote on Blogger for 10 years, and Google deleted it, but how does this happen?
In basic English, it means anyone can report your blog.
This simply cannot happen with WordPress because you are the 100% owner of your site. You can make a backup of it with free plugins at different times 7 days a week, 365 days a year.
Support on Blogger is non-existent: no live chat, no phone support, and even no email support from Google.
But when it comes to WordPress, even the worst hosting provides better support than Blogger.
Have you fallen in love with WordPress? Are you 100% sure?
Let’s get started.
If you already have a domain connected to Blogger then skip this part.
Suppose you have a domain on Namecheap and want to connect it to Blogger.
Follow the below simple steps:
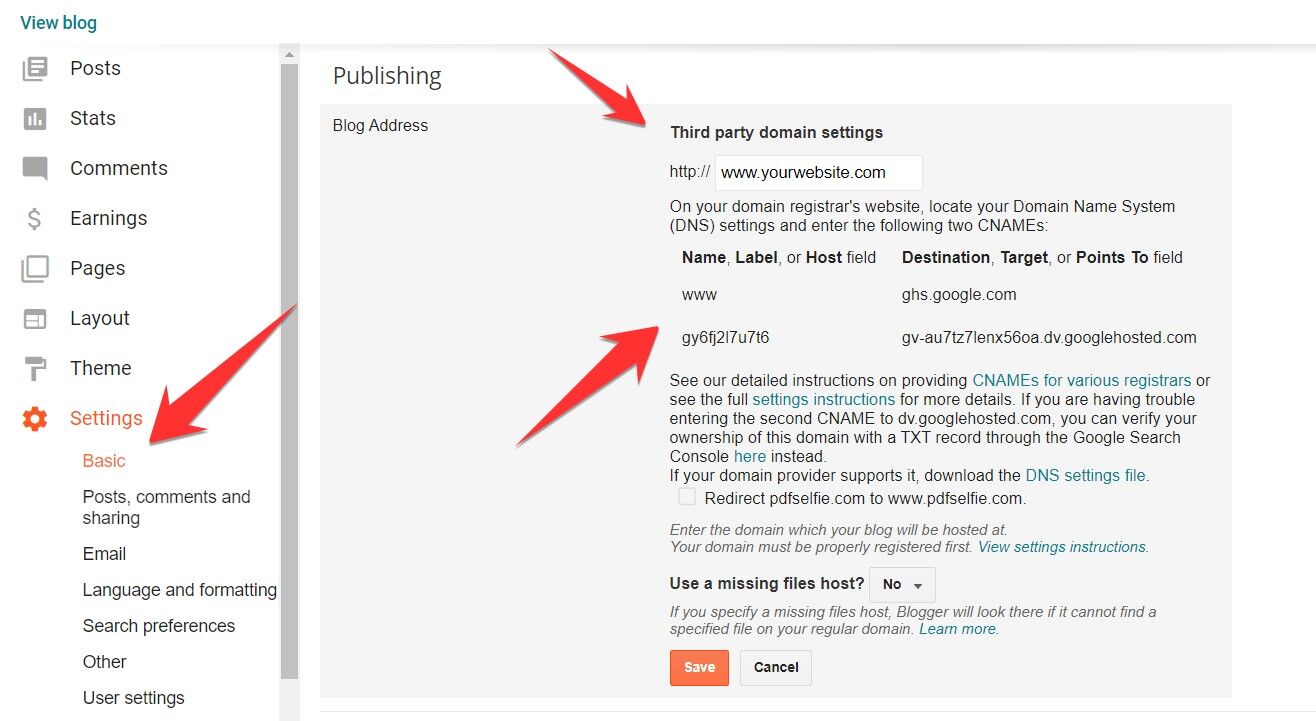
Blogger will provide you:
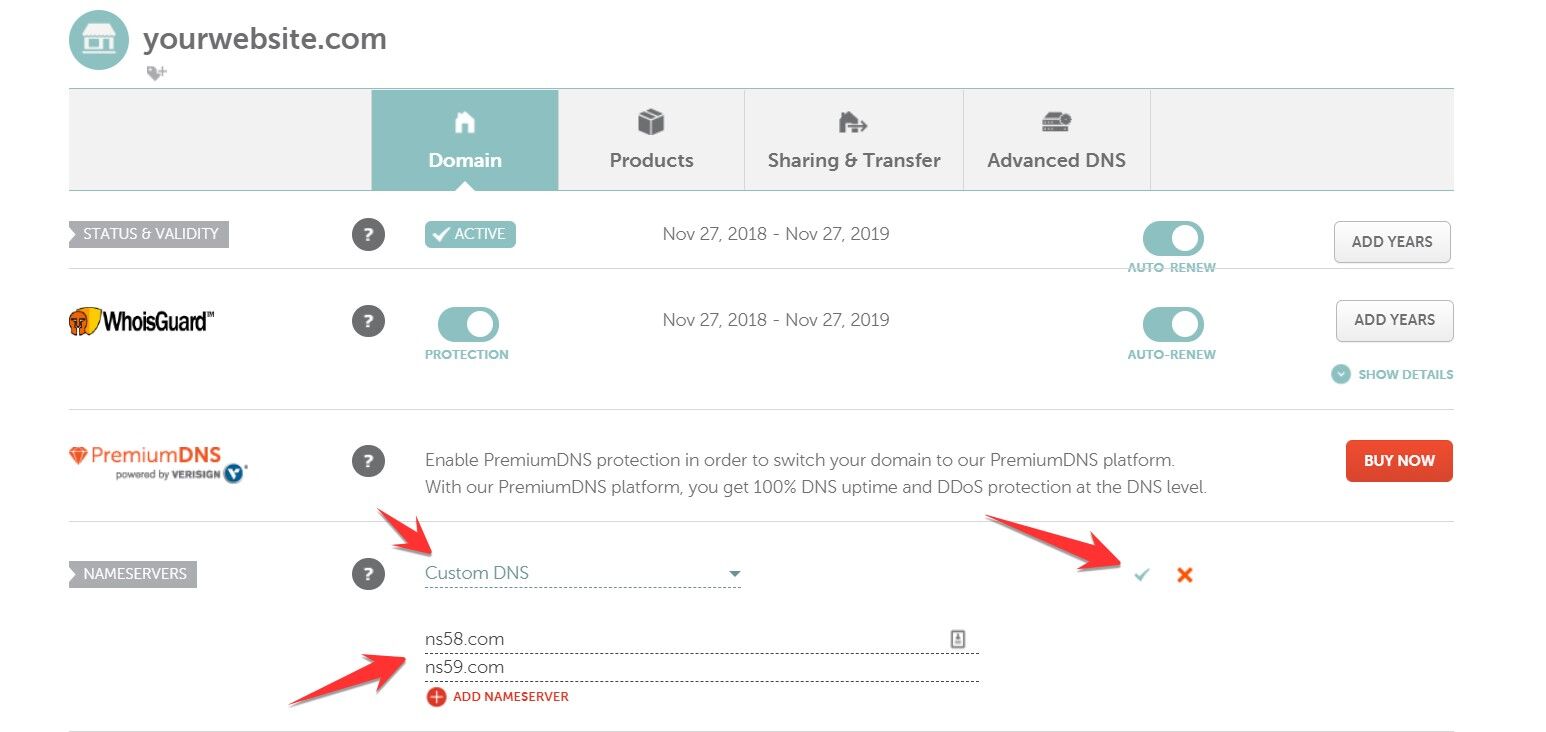
You need to put the cNAMEs and the Google IP addresses in the DNS management setting from your domain registrar.
In the below screenshot, you can see how I have used the cNAMEs and the A Records on my Namecheap domain.
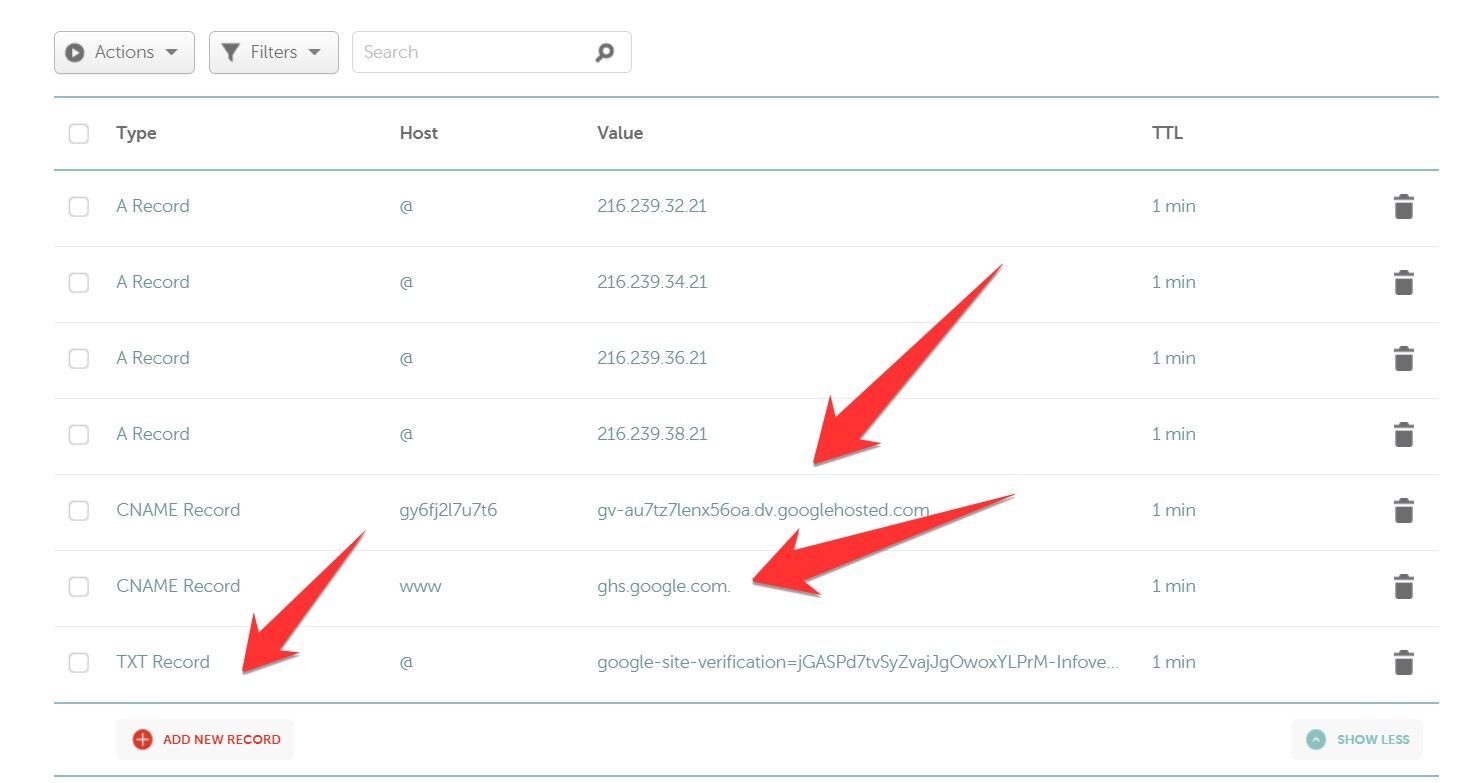
The CNAMEs will be different for your website. Don’t copy exactly from the above screenshot. That being said, there are four A records that you can actually copy verbatim. Those A records are:
It may take from 1 hour to 24 hours to fully connect to Blogger. Otherwise, you will get an error. It happens since DNS propagation takes time.
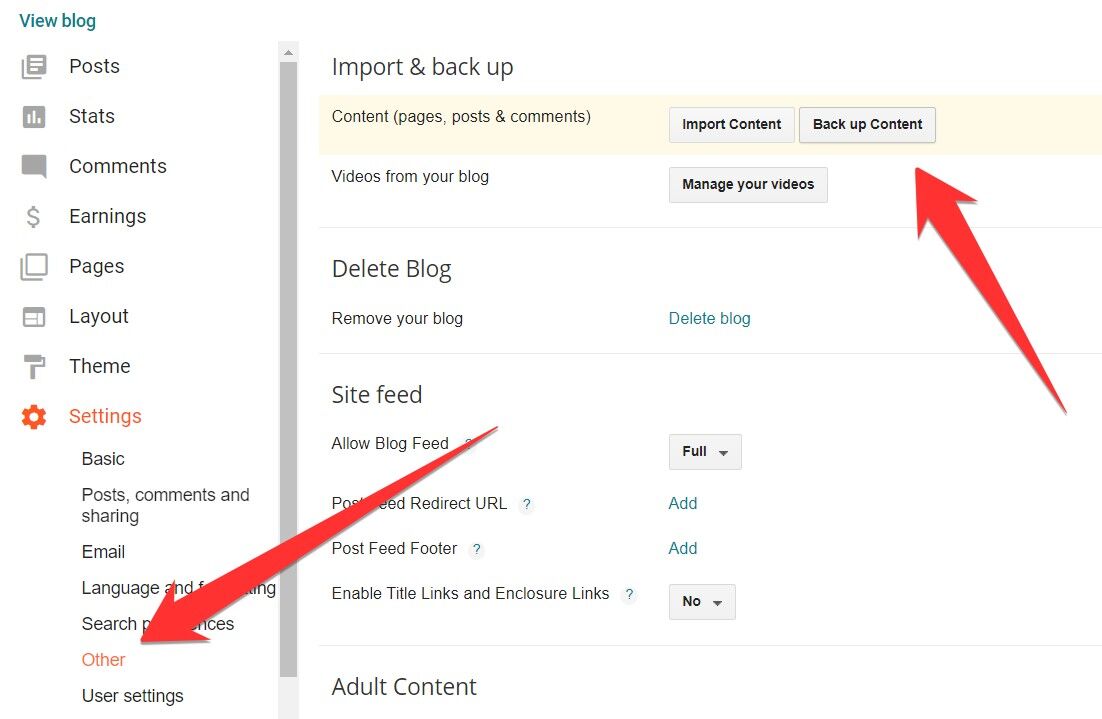
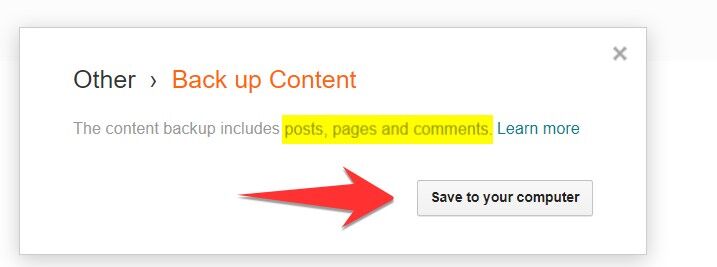
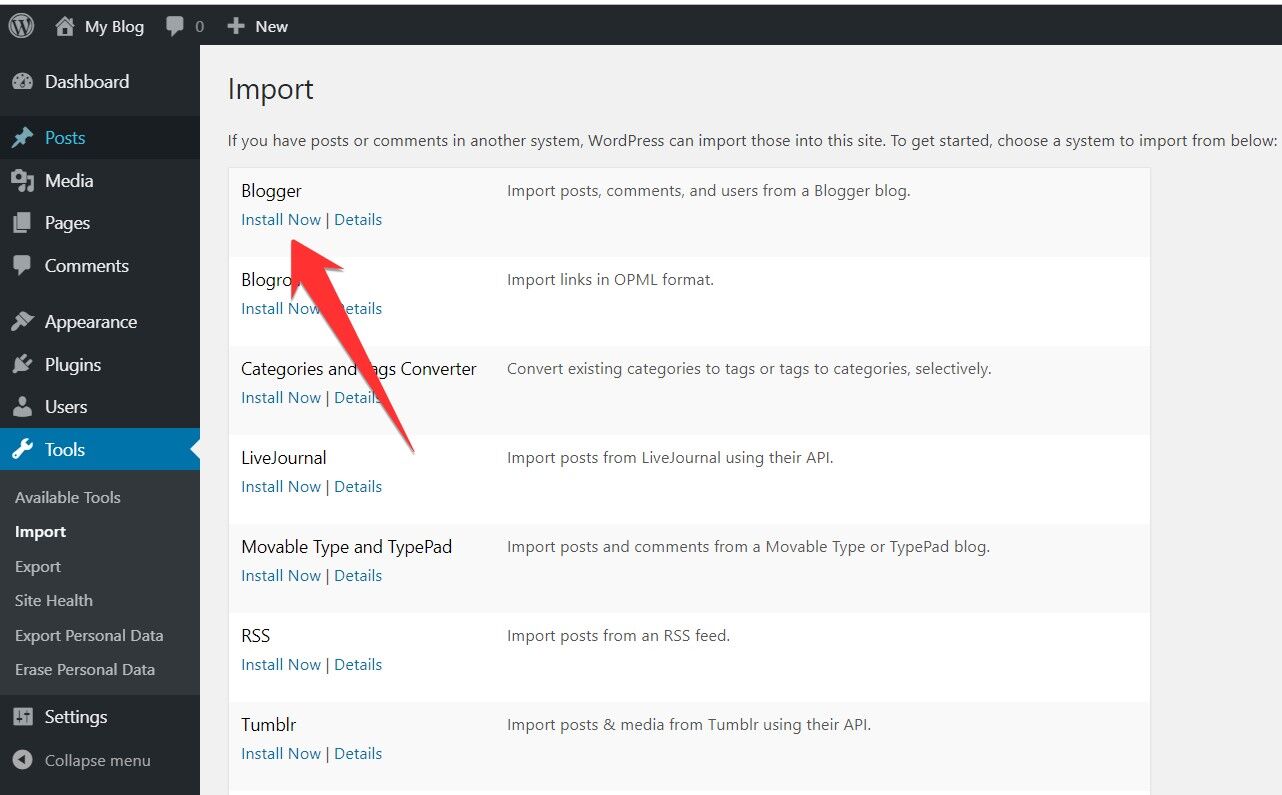
Exporting your Blogger is a piece of cake. The export XML file contains:
Here are the steps you need to take for exporting:
Now it is time to install WordPress on your domain that you used for Blogger.
Please remember your website will not be available during the installation process (ranging from one hour to a day) depending on the DNS propagation time of your domain registrar or hosting.
To make it a safer transition, try this at night (when your site has fewer visitors).
You will need a web host to install WordPress.
I recommend buying hosting that meets the following criteria:
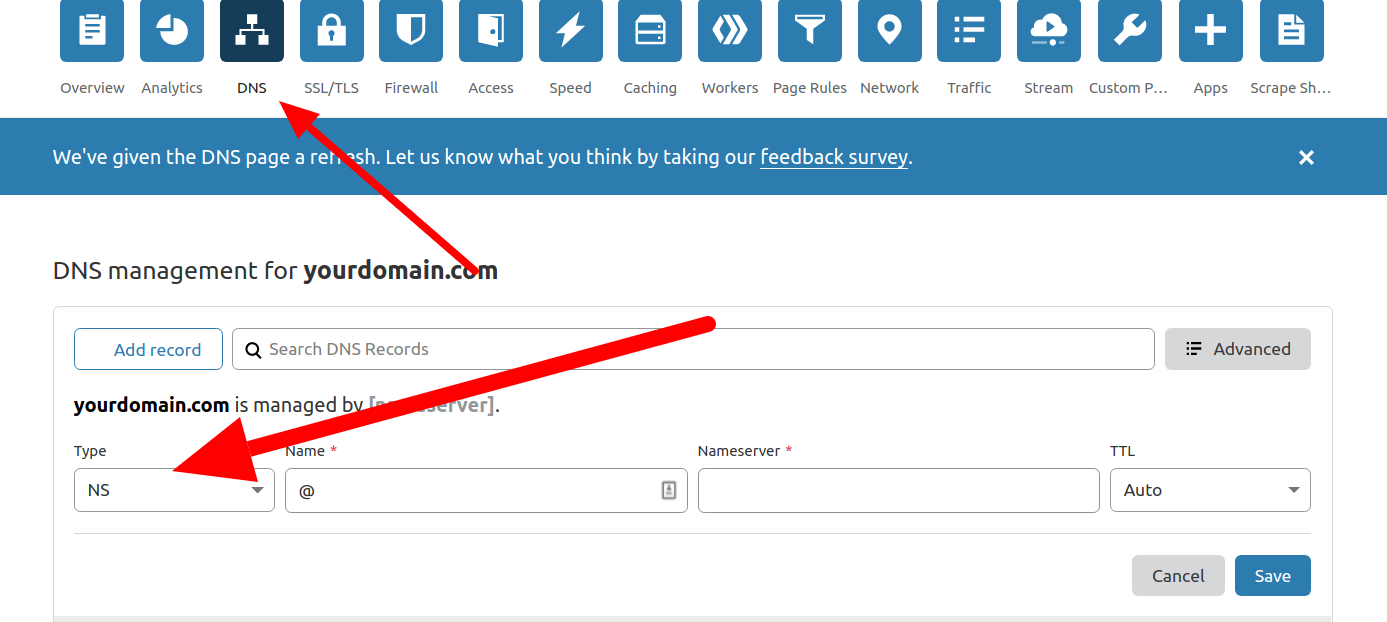
In order to install WordPress on the domain that you used for Blogger, you need to put the nameservers of your hosting in your domain name servers tab, as shown below.
Hint: Get help from your host if you are running into issues.
If you have already installed WordPress on other domains, you will get an addon feature in your cPanel that is used to add additional domains if your hosting supports it.
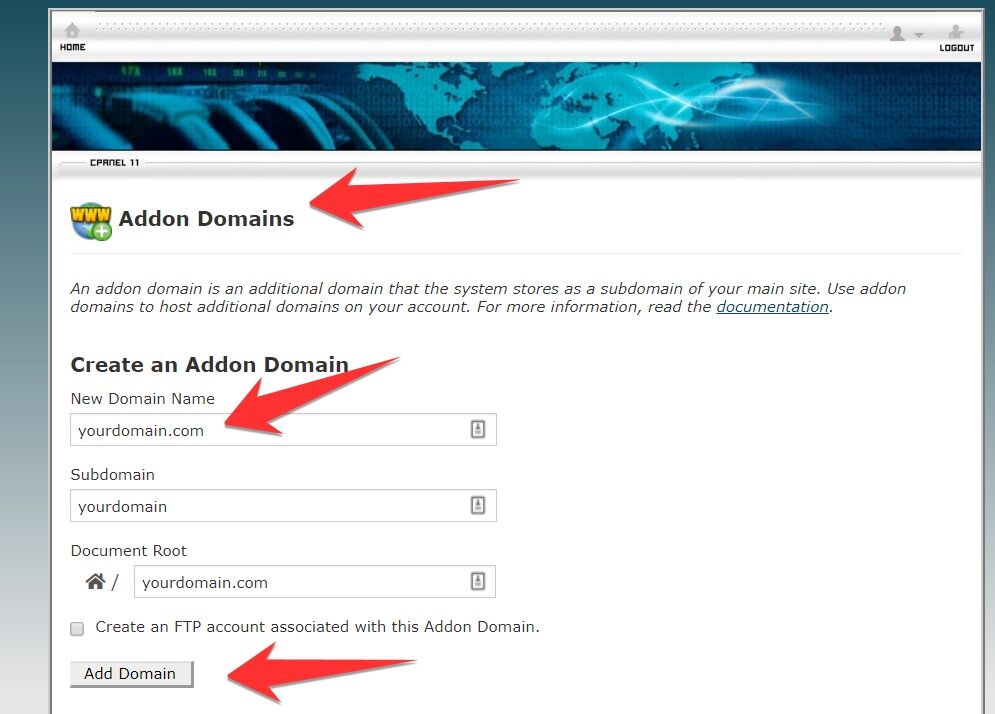
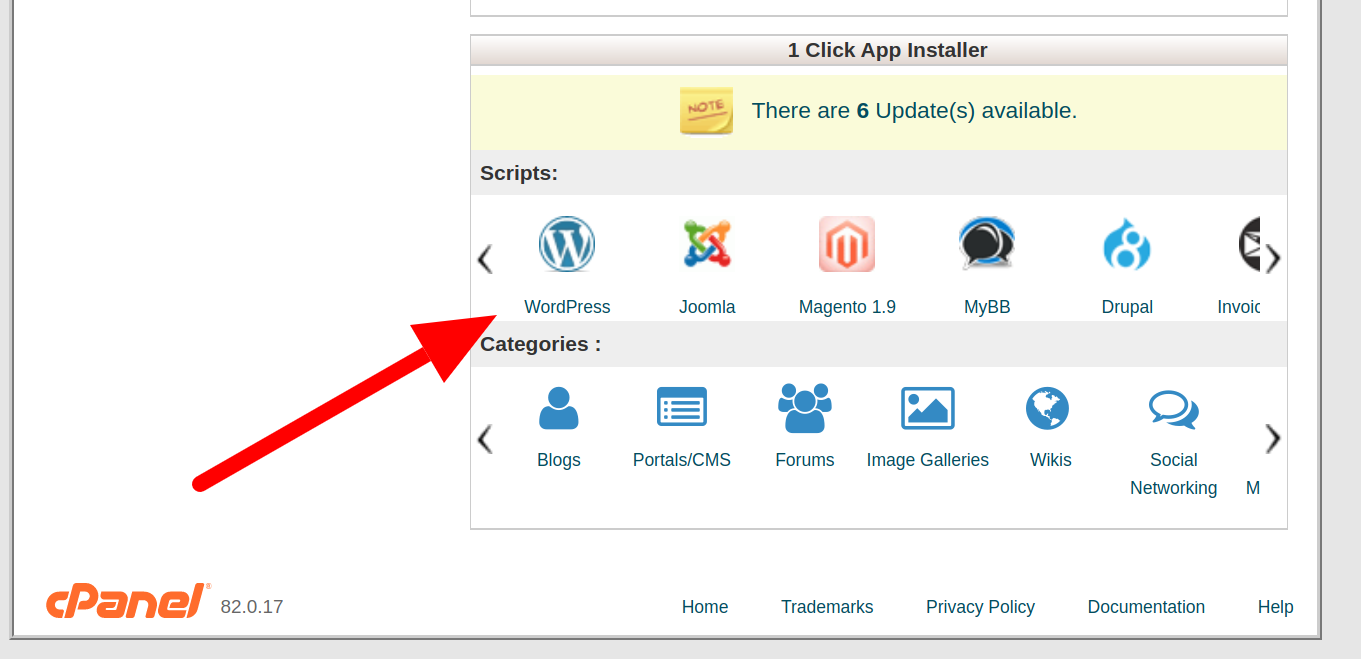
Look for the WordPress icon in your cPanel, and open it.
Install WordPress on your new Blogger domain.
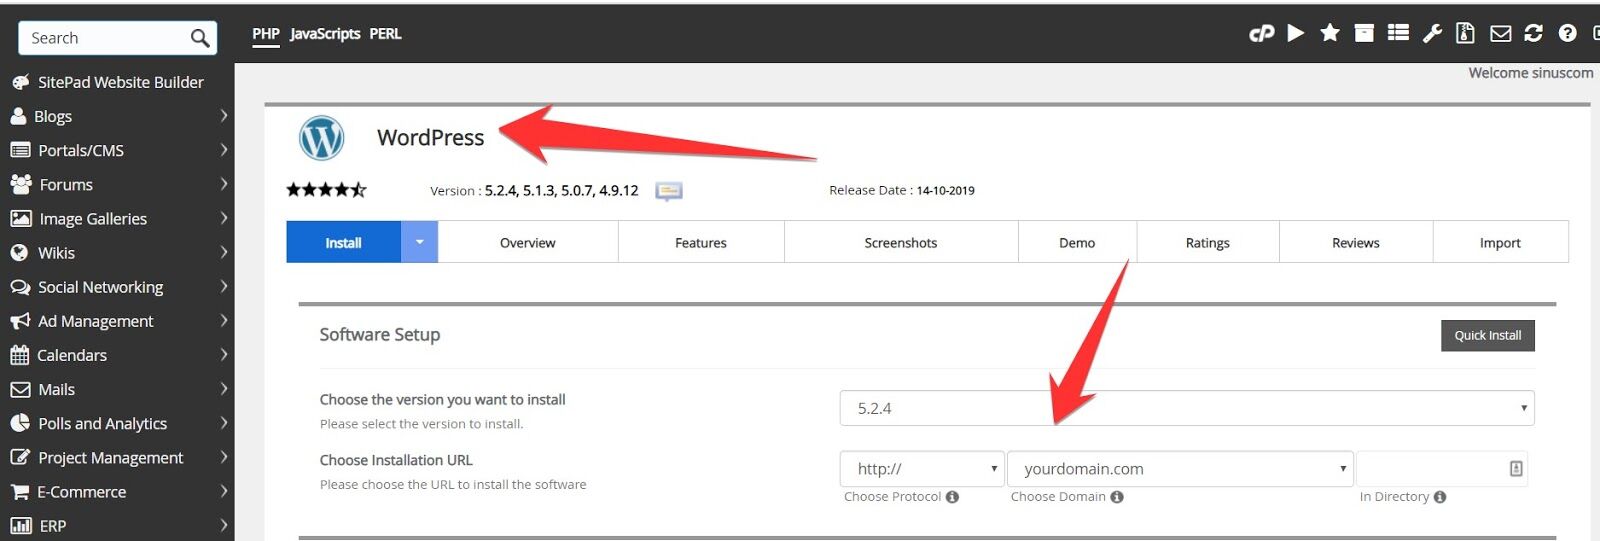
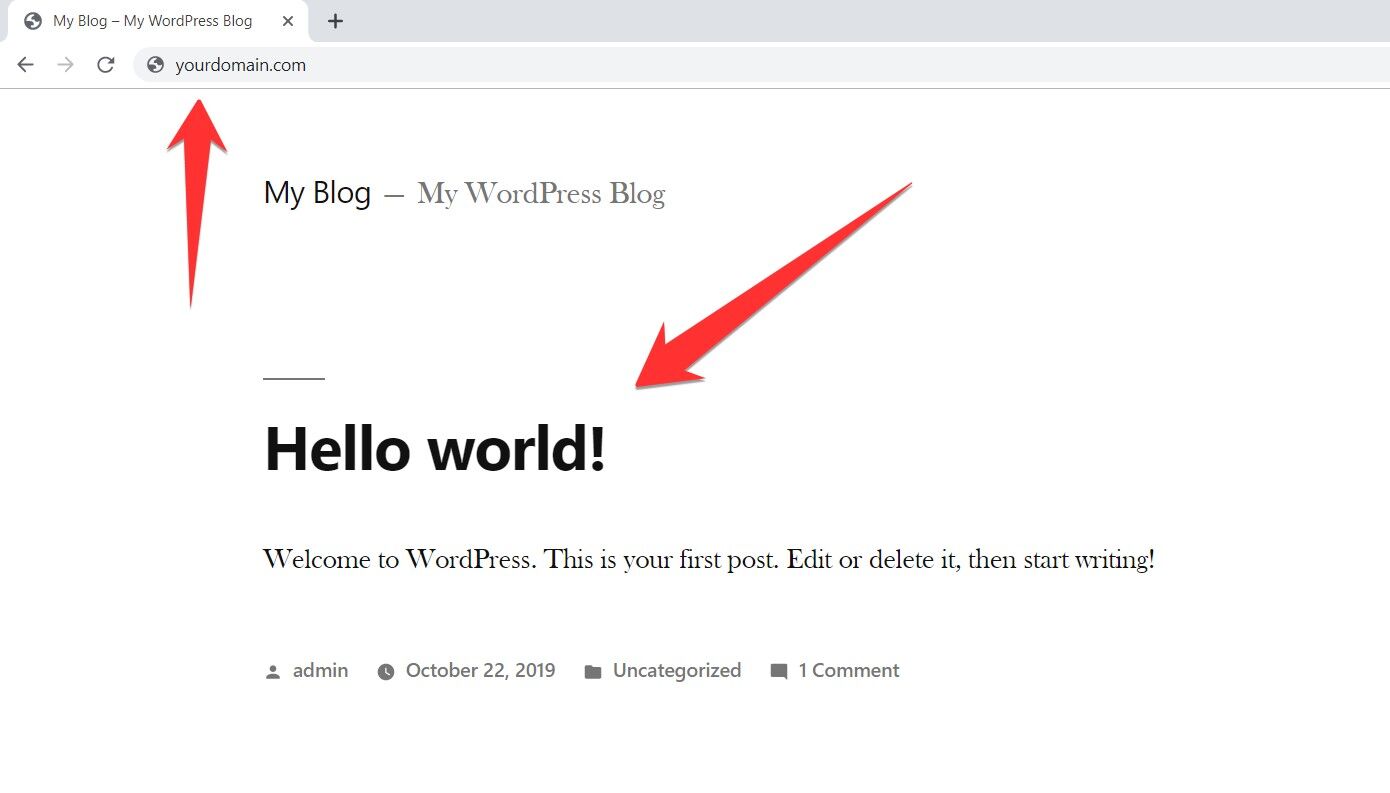
You don’t need to select any theme, click the Install button located at the bottom of this page. Visit the website and you will see the site has been installed.
Sometimes, you have to wait an hour to see your site working (as domain propagation takes time).
Pro Tip for Advanced Users: If you want to perform the process fast, you should connect your custom domain to Cloudflare first. Once activated, you can add your hosting nameservers in Cloudflare; it spreads the DNS faster than your domain registrar and hosting—typically within a minute.
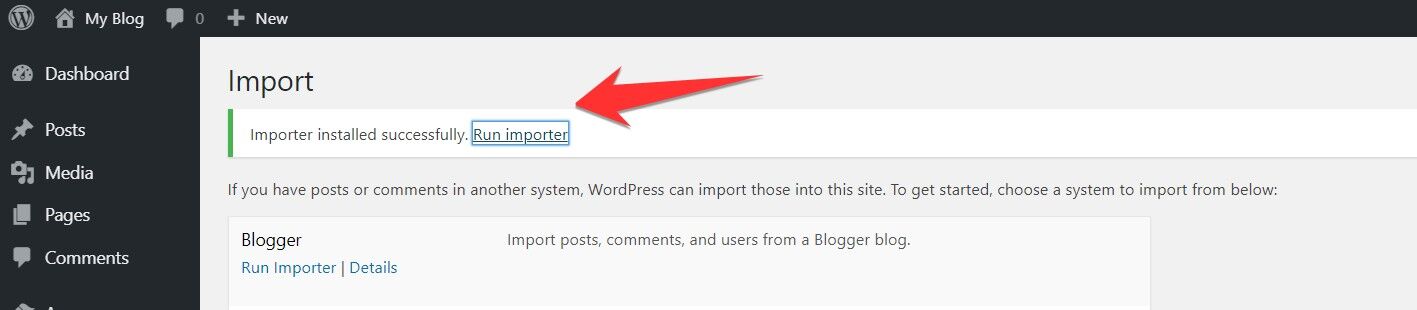
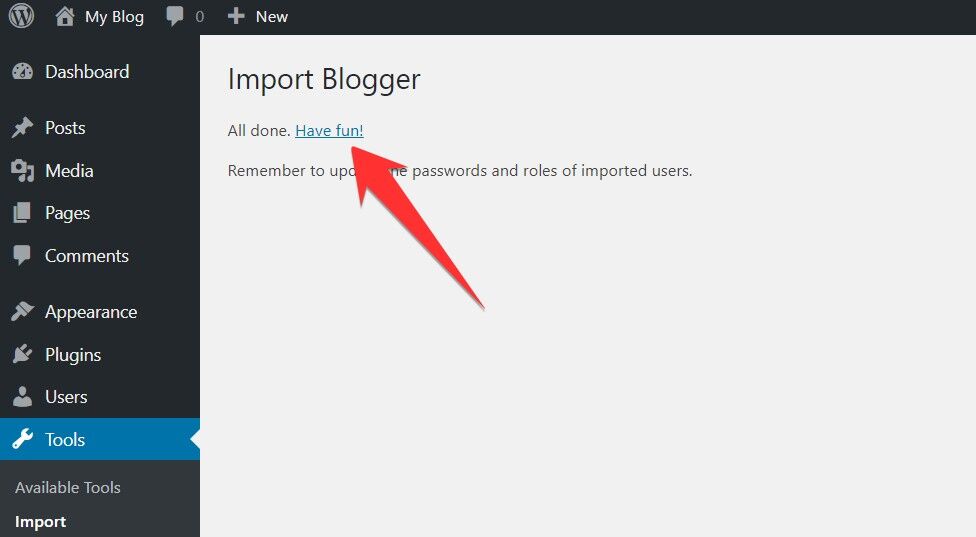
Did you remember the XML file we exported from Blogger? Now is the time to import it to WordPress.
Here’s how to do that:
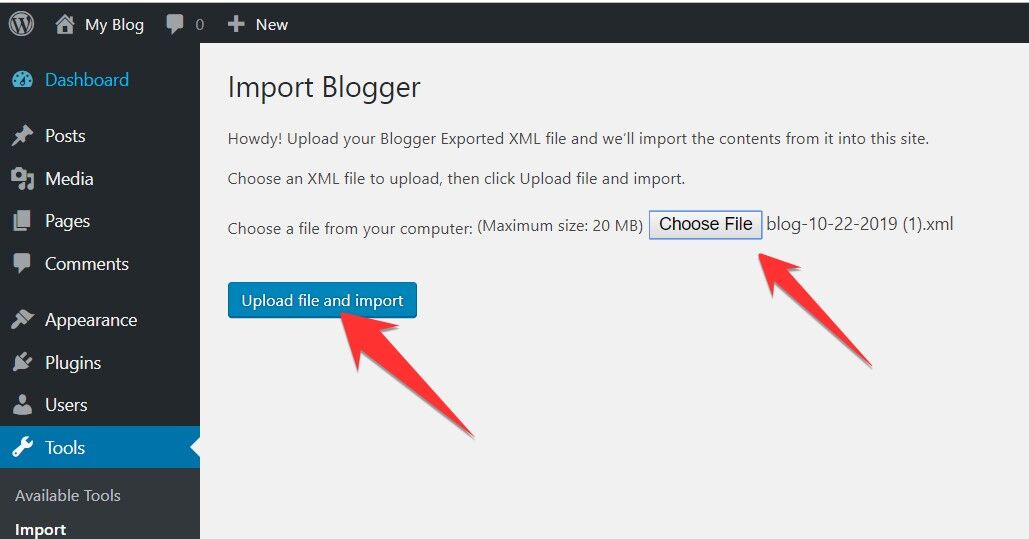

But my file is not being imported? Is it showing nothing? Just a black screen? Help!
It happens because of two reasons:
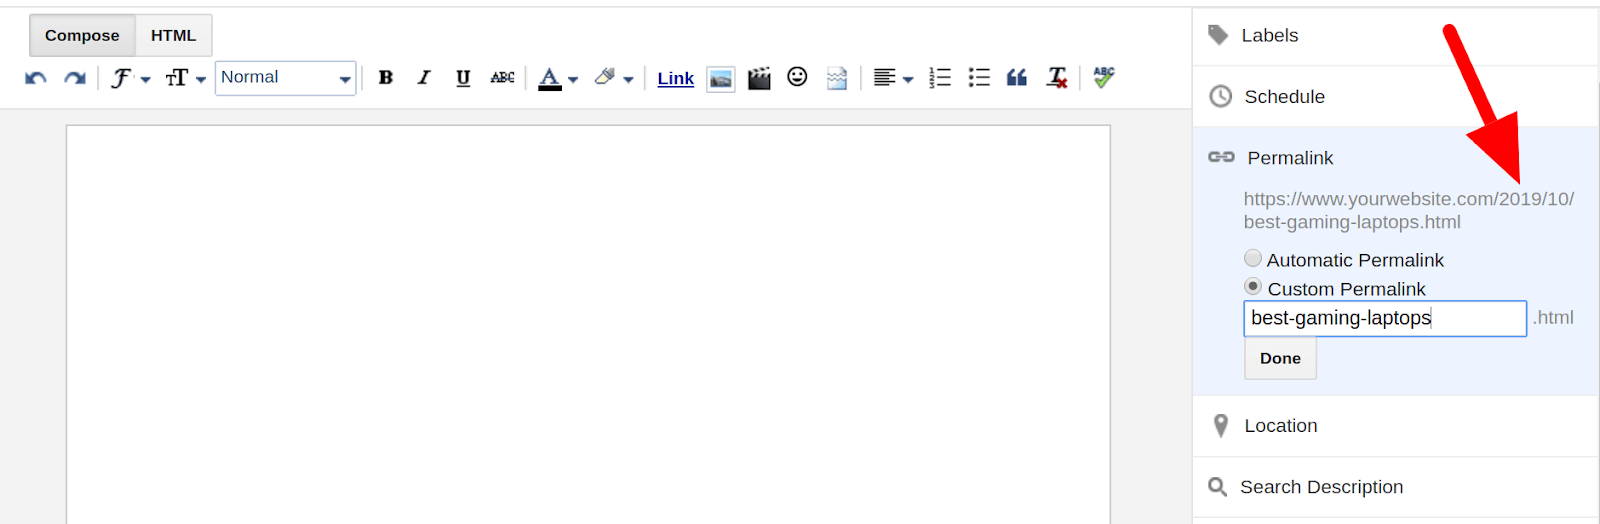
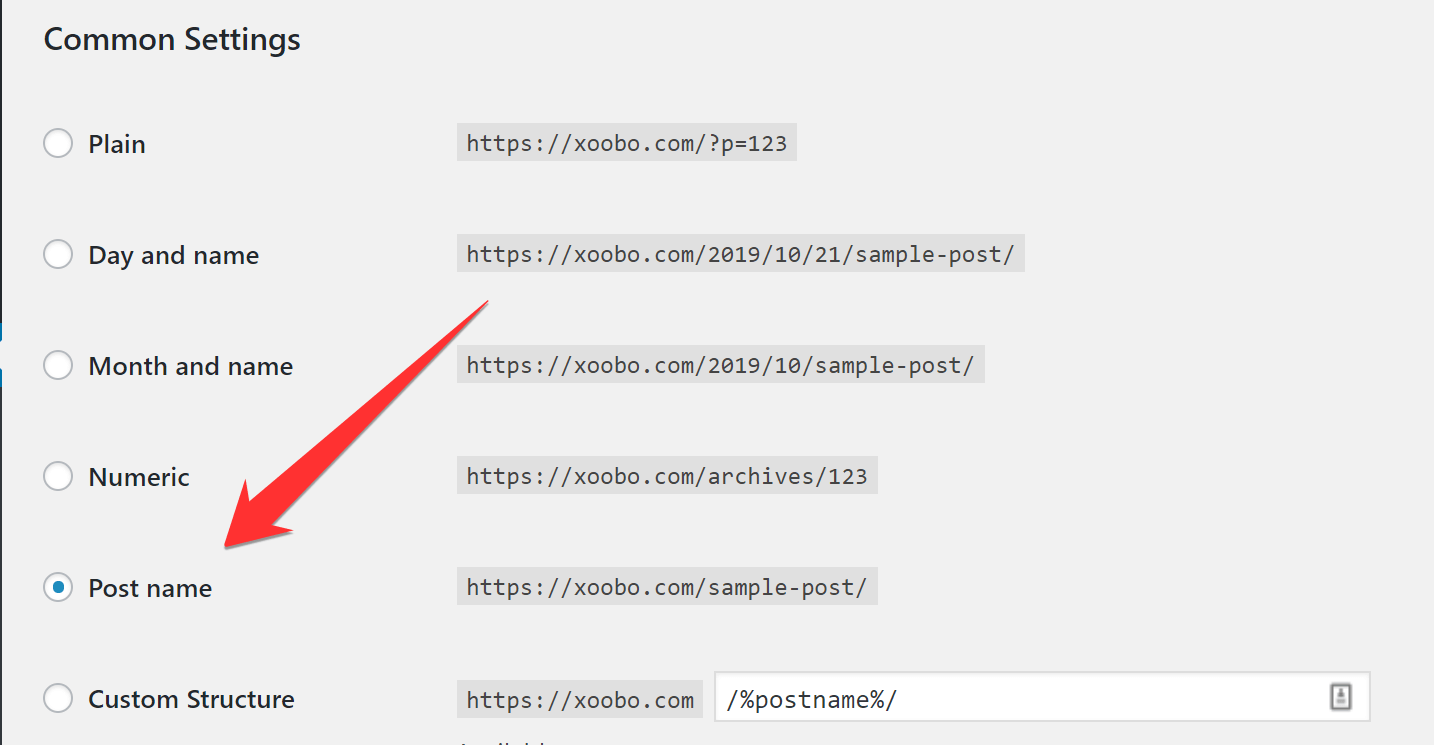
Without setting a permalink, you will lose traffic and rankings because links are a key indicator in Google’s ranking algorithm.
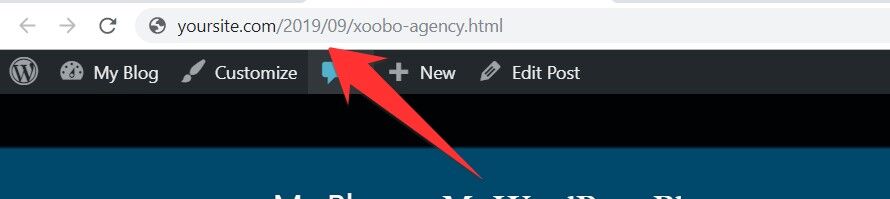
The problem is that WordPress and Blogger have a different permalink structure.
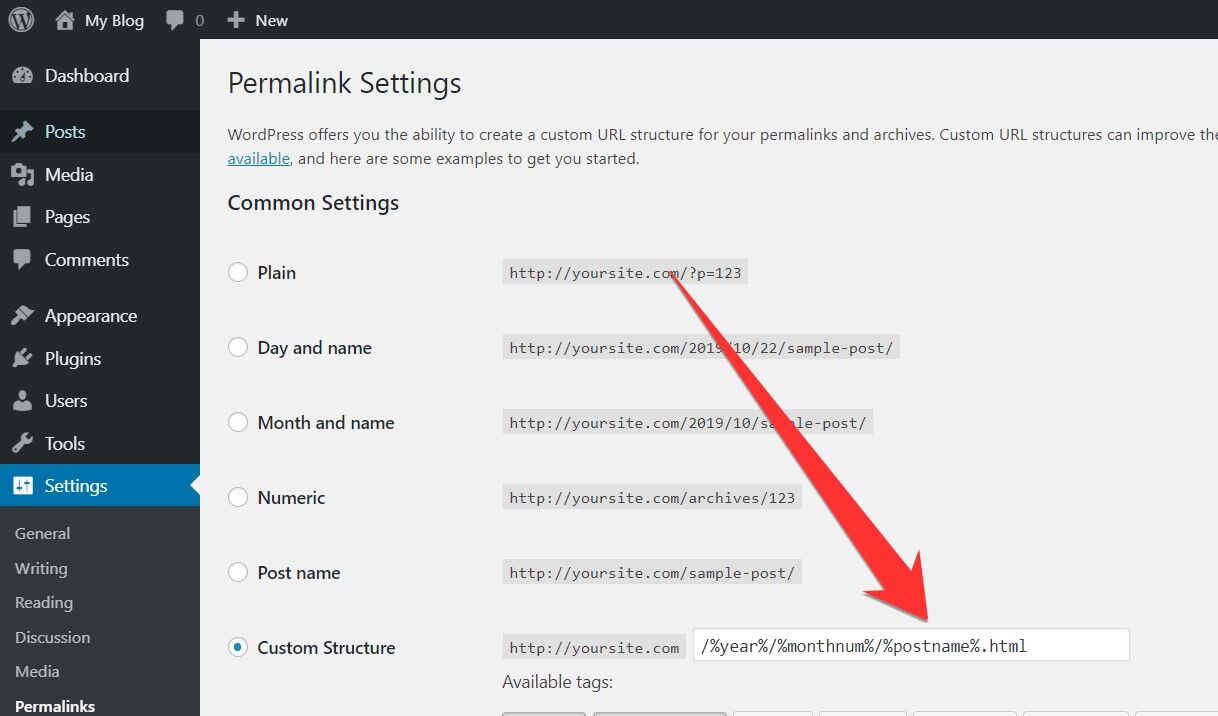
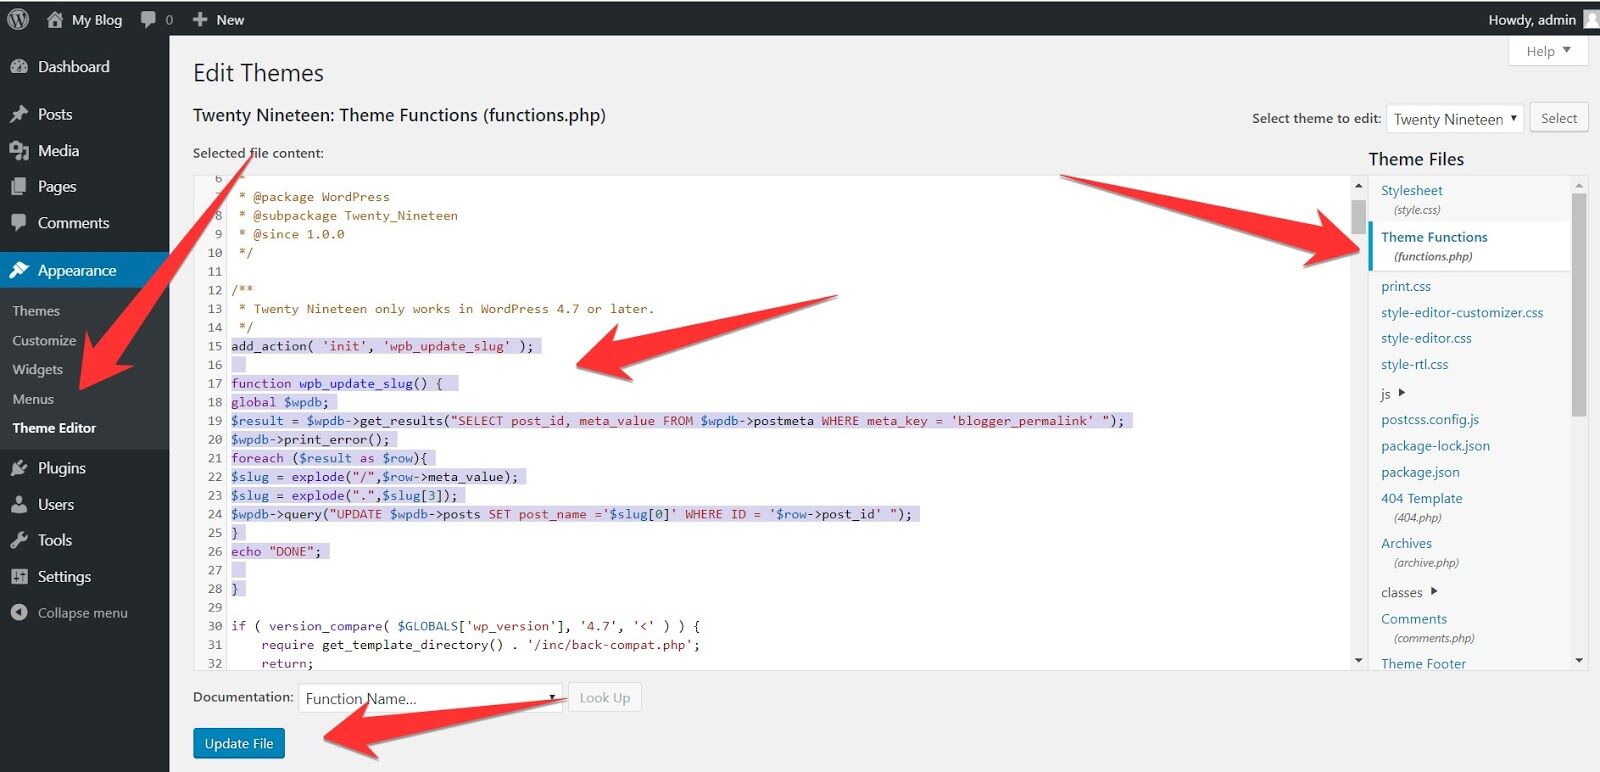
The good news is that you can still set it up custom permalinks on WordPress with the help of the following steps:
/%year%/%monthnum%/%postname%.html
add_action( ‘init’, ‘wpb_update_slug’ );
function wpb_update_slug() {
global $wpdb;
$result = $wpdb->get_results(“SELECT post_id, meta_value FROM $wpdb->postmeta WHERE meta_key = ‘blogger_permalink’ “);
$wpdb->print_error();
foreach ($result as $row){
$slug = explode(“/”,$row->meta_value);
$slug = explode(“.”,$slug[3]);
$wpdb->query(“UPDATE $wpdb->posts SET post_name =’$slug[0]’ WHERE ID = ‘$row->post_id’ “);
}
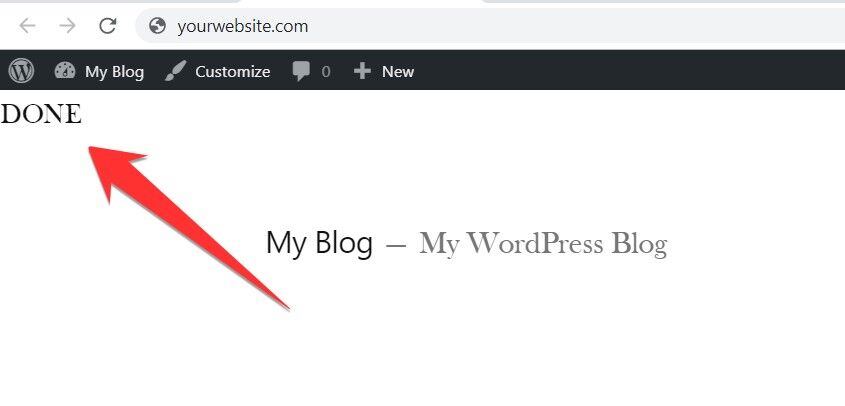
echo “DONE”;
}
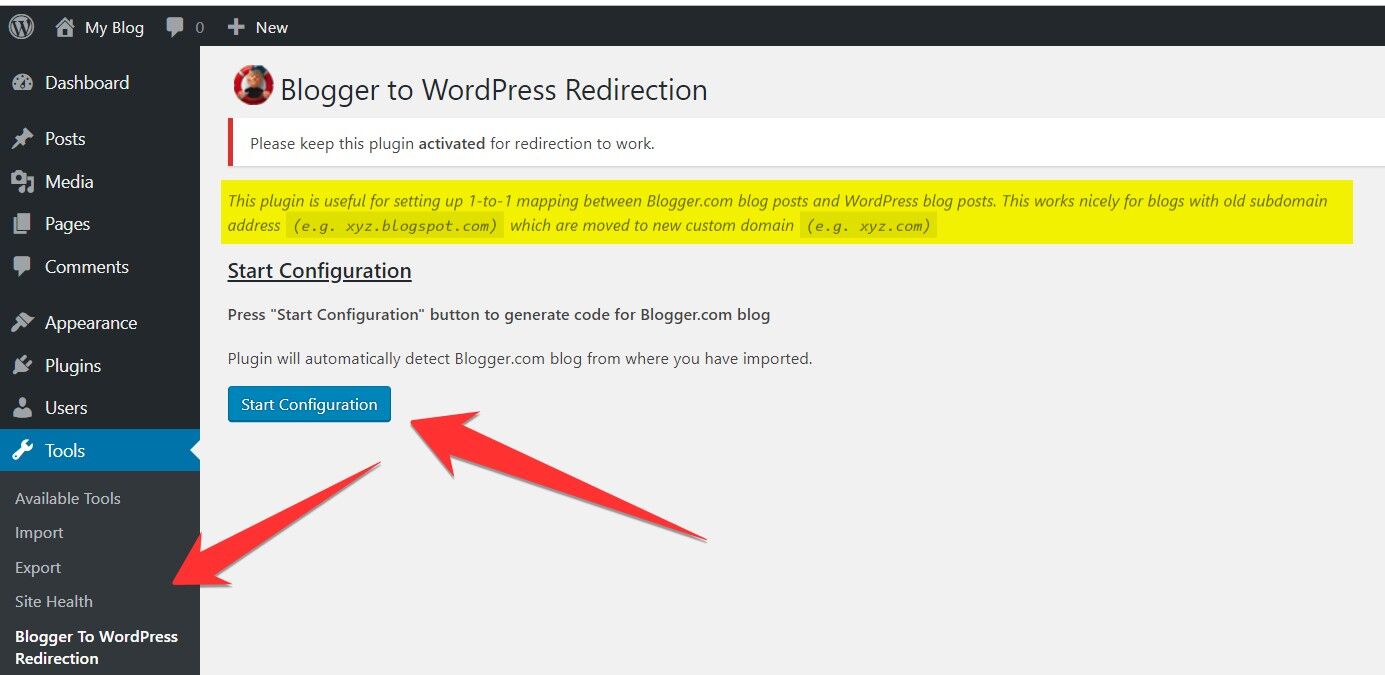
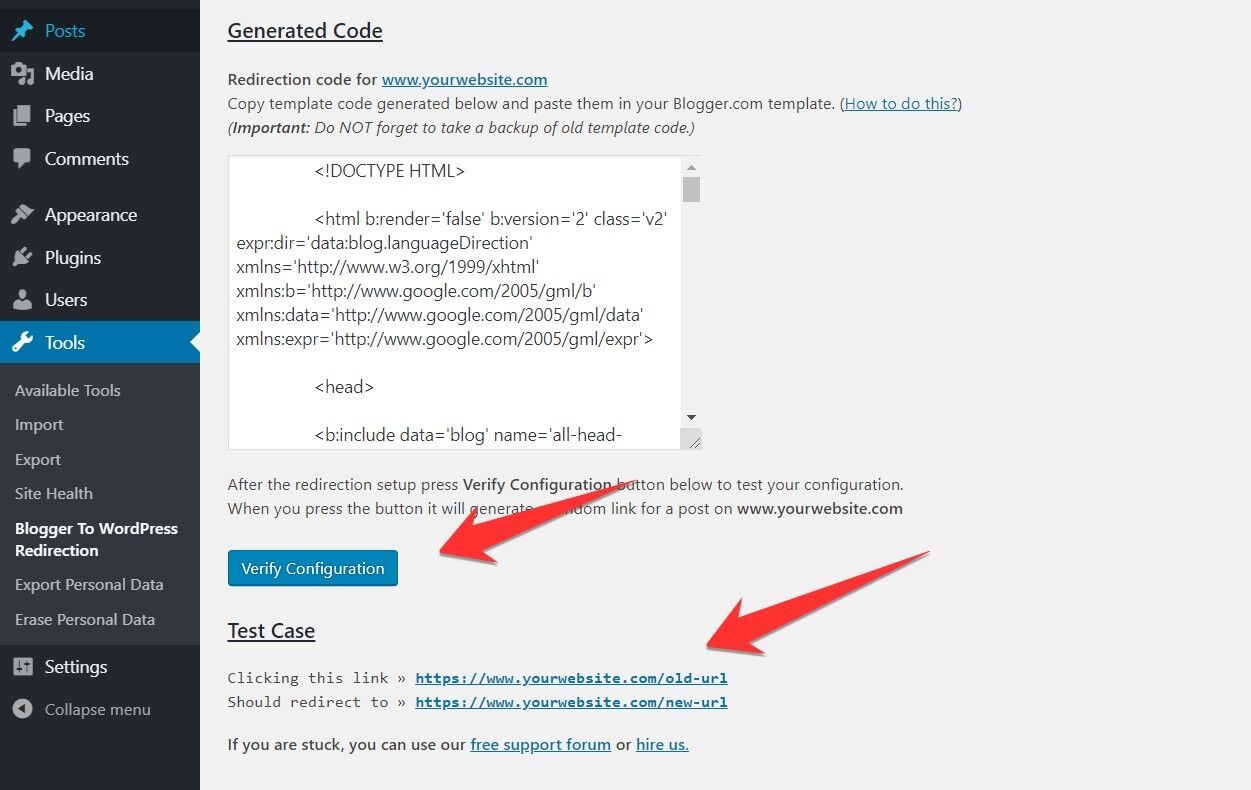
Redirection is one of the most critical steps because you have moved to WordPress, and your old Blogspot is still live.
Both new and old domains may be indexed simultaneously, which can create duplicate content issues.
To fix the problem, we need to redirect all old URLs to new URLs on Blogger.
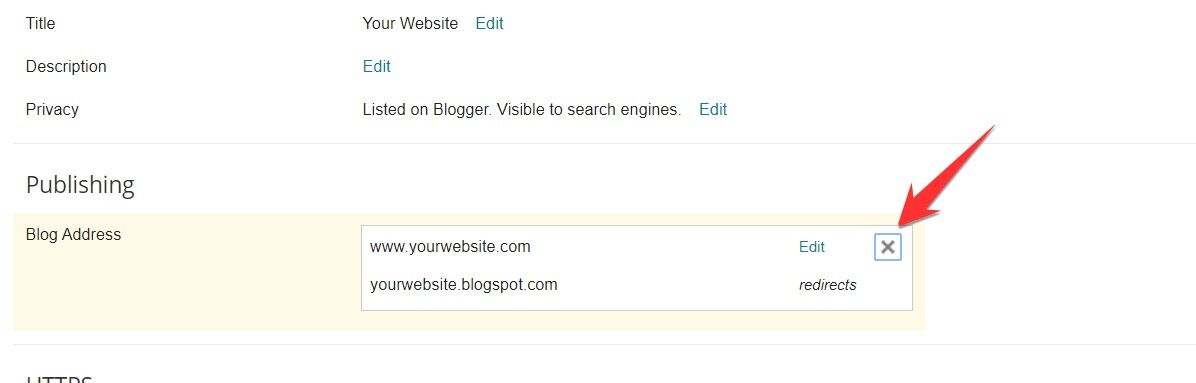
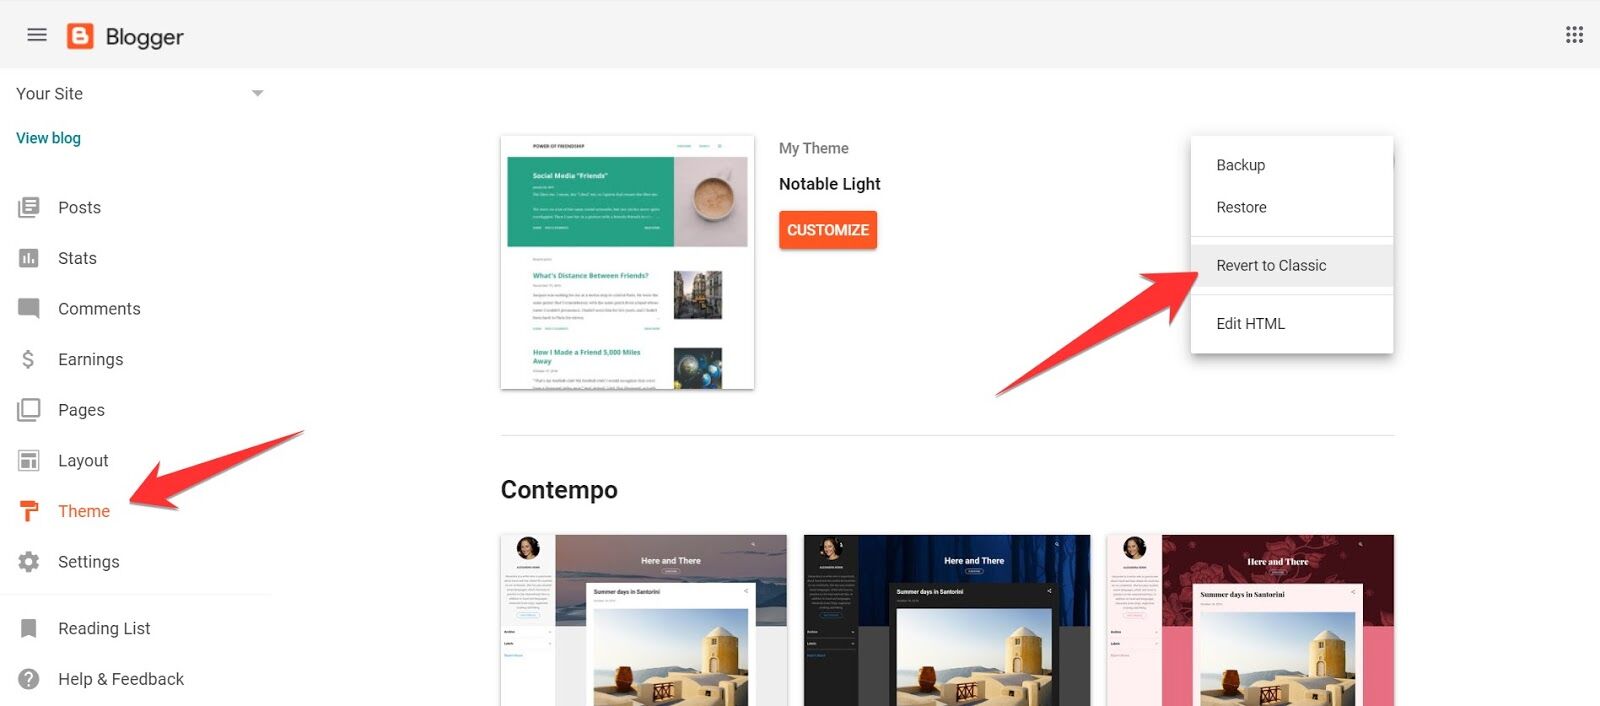
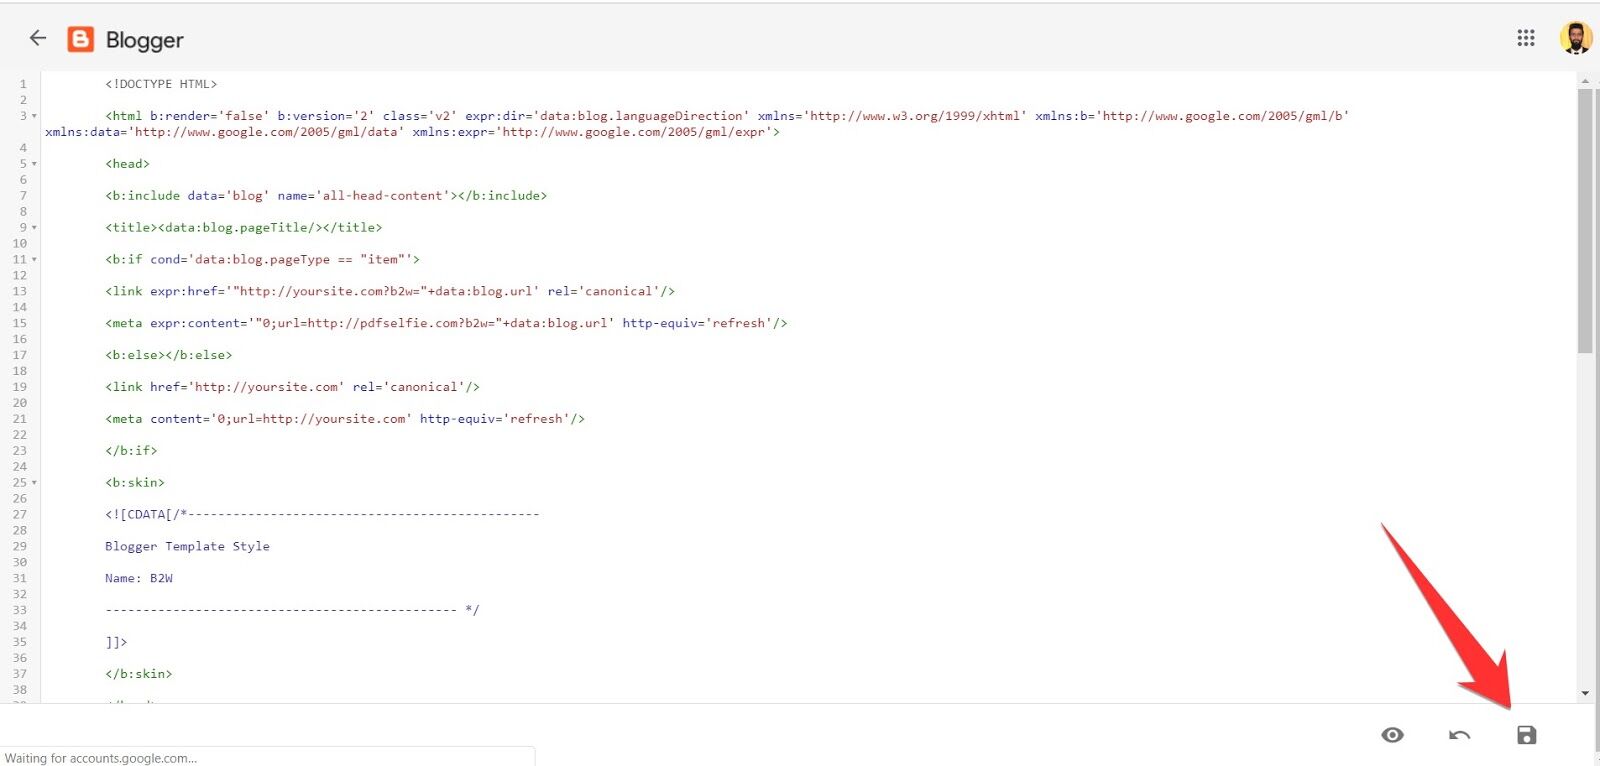
First, you need to remove the custom domain from your Blogger. To do this:

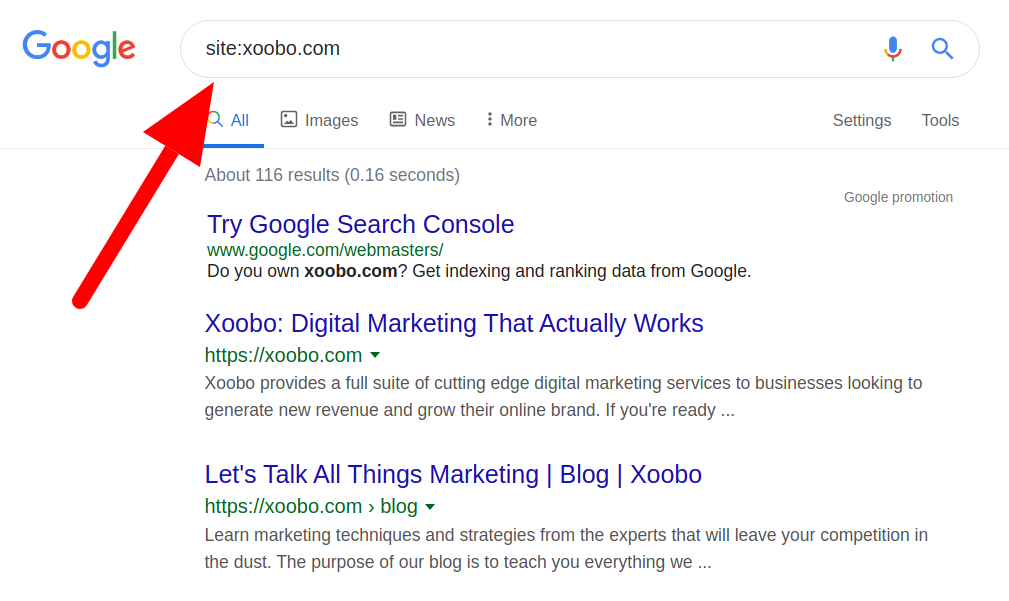
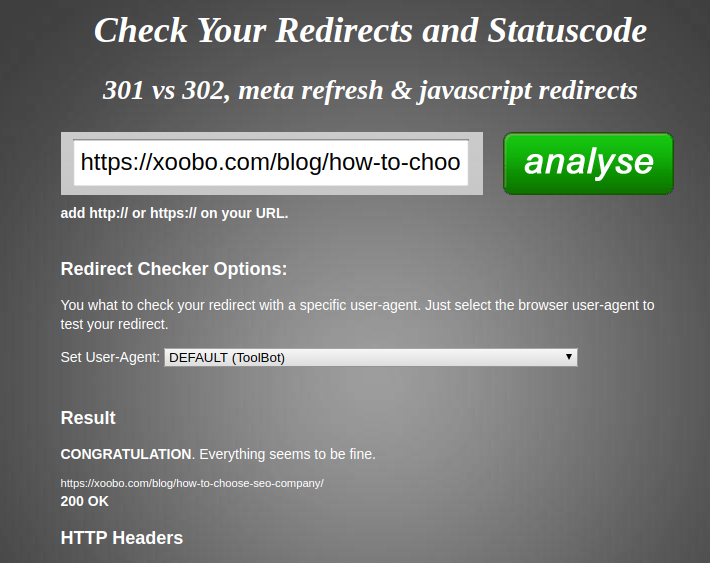
Now you need to check everything from an SEO point of view.
Go to Google, and type site:yourwebite.com to open the URLs. Verify if they are working.
Your blog has now successfully moved from Blogger to WordPress (give yourself a pat on the back). You still need to keep the following points in mind:
Feel free to ask any questions about the migration process below in the comments section.

Leave a Reply